20 Amazing Crochet Edging And Borders Ideas
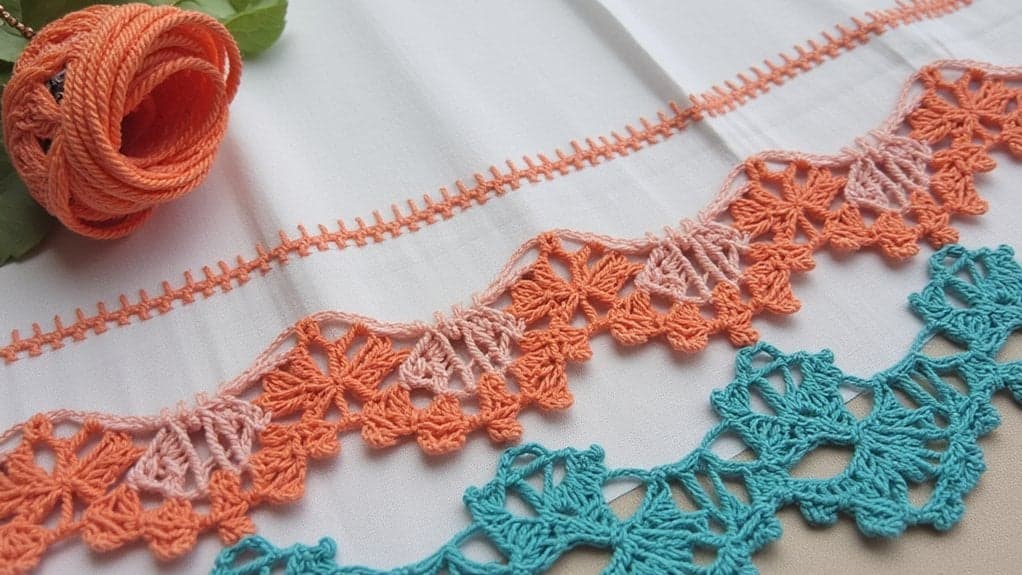
Get ready to transform your crochet projects with amazing edging ideas! Try the Shell Stitch Edging for a wavy look or the Picot Border for a classic touch. Ribbed Edging adds a cozy feel, while the Scalloped Edge gives a lovely elegance. Don't forget the Chunky Twist Border for warmth, and the V-Stitch Edging for an airy finish! With just a bit of practice, you'll create beautiful pieces that you'll be proud to show off! There's even more to discover!
Key Takeaways
- Explore elegant options like Shell Stitch Edging and Picot Border for a sophisticated finish on your crochet projects.
- For a cozy texture, consider Ribbed Edging and Double Crochet Shells to add warmth and dimension.
- Fun styles like Scalloped Edge and Curvy Shells can enhance your creations with playful and elegant designs.
- Bold patterns such as Chevron Border and Alternating Color Stripe Edge create eye-catching contrasts and vibrant looks.
- Combine different edging styles and experiment with colors to personalize your crochet projects and make them unique.
Shell Stitch Edging

When it comes to adding a lovely finish to your crochet projects, shell stitch edging is a fantastic choice! This charming border creates a beautiful wave-like effect that enhances your work. To get started, you'll need yarn, a crochet hook, and a basic understanding of double crochet. Simply make a foundation row, then alternate between clusters of double crochet and chains to form the shells. It's easy, fun, and gives your projects a polished look! You'll feel proud showcasing your creations with this delightful edging. So grab your supplies and let your creativity shine through every shell you stitch! For a more professional appearance, maintain even tension throughout your edging to ensure consistent shell shapes and sizes.
Picot Border

The picot border is a delightful way to add a charming touch to your crochet projects! This playful edge features small, looped stitches that create a lovely, decorative effect. To make it, you'll need your favorite yarn, a crochet hook, and a little patience. Start by chaining, then create clusters of double crochets, finishing with a picot stitch for that classic look. Shell stitches and waves can be combined with picot edges for more intricate designs.
| Step | Description | Tips |
|---|---|---|
| 1 | Chain desired length | Keep it even! |
| 2 | Double crochet clusters | Use consistent tension! |
| 3 | Finish with picot stitch | Count your stitches! |
| 4 | Weave in ends | Neaten your work! |
Enjoy this beautiful finish!
Ribbed Edging

Ribbed edging can really elevate your crochet project, creating a cozy and textured finish that's both stylish and functional! To achieve this look, you'll need your favorite yarn and a compatible crochet hook. Simply crochet in the front and back loops to create those lovely ribs. It's perfect for blankets, scarves, or hats! As you work, feel the fabric transform under your hands, adding depth and interest. Don't worry if it takes a little practice; you'll get the hang of it! Once finished, you'll love how this technique enhances your project, making it truly unique and eye-catching. Happy crocheting! This versatile technique pairs beautifully with classic shell borders for added dimension and visual interest.
Scalloped Edge

If you're looking to add a touch of elegance to your crochet projects, a scalloped edge might be just what you need! This charming border creates a lovely wave-like effect that enhances blankets, scarves, or even dishcloths. To create a scalloped edge, you'll need a crochet hook and yarn in your desired colors. Simply crochet a series of double crochets, chain stitches, and slip stitches to form the scallops. Don't worry, it's easier than it sounds! Once you master this technique, you'll be amazed at how it transforms your work. Get ready to impress with your beautiful, finished pieces! This classic border design is often paired with shell stitch patterns to create professionally finished edges that elevate any handmade item.
Lace Trim

Adding a lace trim can truly elevate your crochet projects, making them look delicate and sophisticated! You can use lightweight yarn and a small hook to create beautiful lace edges that add charm to your blankets, garments, or even home décor. Victorian-style designs offer timeless elegance perfect for special occasion pieces.
| Lace Trim Type | Ideal Projects |
|---|---|
| Shell Lace | Shawls, scarves |
| Picot Edge | Baby blankets, hats |
| Floral Lace | Doilies, table runners |
With just a bit of practice, you'll master these trims and impress everyone with your stunning creations! Enjoy crocheting!
Granny Stripe Border

You're going to love the Granny Stripe Border! This fun and colorful technique adds a cheerful touch to any project. To start, you'll need your favorite yarn and a suitable hook. Simply create a foundation chain, then work in double crochet stitches across each row. Alternate colors for a vibrant look! The Granny Stripe Border is perfect for blankets or shawls, giving them a cozy, finished edge. Plus, it's easy to customize the width by adjusting the number of double crochets. Grab your supplies, settle in, and let your creativity shine as you create this delightful border! Happy crocheting!
Bobble Stitch Edge

The Bobble Stitch Edge is a delightful way to add texture and charm to your crochet projects! You'll love how these little bobbles pop out, creating a fun and playful look. Grab your yarn and hook, then follow these steps to achieve a beautiful finish!
- Choose a yarn that complements your project.
- Practice the bobble stitch to guarantee you're comfortable with the technique.
- Finish your edge with a row of single crochet for a polished look!
You'll find that adding this edge not only enhances your work but also brings you joy with every stitch! Enjoy crocheting!
Simple Single Crochet Border

After enjoying the playful texture of the Bobble Stitch Edge, you might want to try something even simpler! The Simple Single Crochet Border is perfect for beginners. It's quick and easy, adding a neat finish to your projects. Just grab your yarn, a crochet hook, and let's get started!
| Step | Description |
|---|---|
| 1. Yarn & Hook | Choose your favorite yarn and a hook that matches! |
| 2. Start Crocheting | Insert hook, yarn over, pull through, and repeat! |
| 3. Finish | Slip stitch to join and weave in ends! |
You'll love the polished look!
Crusty Crab Stitch

Get ready to level up your crochet game with the Crusty Crab Stitch! This fun and textured stitch creates a beautiful, wavy border that's perfect for enhancing your projects. You'll love how easy it is to master!
Here's what you need to get started:
- Your favorite yarn and appropriate hook size
- Basic crochet skills, especially the single crochet
- Patience and creativity to enjoy the process!
Once you try the Crusty Crab Stitch, you'll find it adds a unique flair to blankets, hats, and more! So grab your yarn, and let's plunge into this exciting stitch together!
Frilly Ruffle Edge

Ready to add a touch of whimsy to your crochet projects? The Frilly Ruffle Edge is perfect for that! Start with a basic stitch, like double crochet, and then add a ruffle by working into the same stitch multiple times. This creates a beautiful flared effect! You'll want to use a lightweight yarn for a delicate look, and a larger hook size helps make those playful ruffles pop. As you work, don't forget to space your stitches evenly for a consistent finish. Once complete, you'll love how this charming edge transforms your piece, making it truly special and unique! Enjoy crocheting!
Twisted Fringe Border

The Twisted Fringe Border adds a fun and stylish finish to your crochet projects! It's perfect for blankets, scarves, or even bags, giving them that extra flair you'll love. To create this border, you'll need some yarn, scissors, and a crochet hook.
Here's how to get started:
- Cut strands of yarn to your desired fringe length.
- Fold them in half and attach them to your project using slip knots.
- Twist the strands together for a chic look!
You'll be amazed at how simple it is, and your finished piece will look fantastic! Enjoy creating your unique style!
Double Crochet Shells

Double Crochet Shells are a delightful way to add texture and beauty to your crochet projects! You'll create these lovely shells by working multiple double crochets into the same stitch, forming a fan-like shape. Start with a foundation chain, then choose a stitch pattern to follow. As you work, you'll see the shells pop beautifully, giving your project a polished look! This technique works great for blankets, shawls, or even simple dishcloths. Don't be afraid to experiment with colors and yarn types, too! Once you try Double Crochet Shells, you'll want to use them everywhere in your crochet adventures!
Knotted Edge

If you're looking for a fun and charming way to finish off your crochet projects, then a Knotted Edge might just be the perfect choice! This technique adds a playful touch, making your work stand out beautifully. Plus, it's super simple to do!
Here are some ideas you can try with a Knotted Edge:
- Use different yarn colors for a vibrant look!
- Combine with other edging styles for added flair!
- Experiment with knot sizes to create unique textures!
Chevron Border
Ready to add some zigzag flair to your crochet projects? The chevron border is a fantastic choice! Start by choosing your favorite yarn and a hook that matches the yarn weight. Create a foundation chain, then alternate between double crochet and chain stitches to form those fun peaks and valleys. It's all about rhythm! As you work, watch your project transform with each stitch. This border looks great on blankets, scarves, or even bags! Plus, it's super satisfying to see that bold pattern emerge. So grab your yarn, and let's make your creations pop with this cheerful chevron border!
Waves and Curves

Once you've mastered the chevron border, you'll find that adding waves and curves to your crochet projects can be just as delightful! These playful designs not only enhance your work but also give it a unique touch. You can create lovely textures by using simple stitches and varying your yarn colors. Here are a few ideas to inspire you:
- Ripple Effect: A series of peaks and valleys for a dynamic look.
- Curvy Shells: Soft, shell-like shapes that add elegance.
- Undulating Waves: Flowing patterns that mimic ocean waves.
Get creative, have fun, and let those waves and curves bring your projects to life!
Floral Lace Edging

As you explore the world of crochet edging, floral lace designs can add a touch of charm and elegance to your projects! These delicate patterns are perfect for enhancing blankets, shawls, or even garments. You'll need cotton yarn, a size G or H hook, and a basic understanding of chain and double crochet stitches.
Here's a quick reference table for popular floral lace edging patterns:
| Pattern Name | Skill Level | Project Ideas |
|---|---|---|
| Daisy Lace | Beginner | Baby blankets |
| Rose Border | Intermediate | Shawls |
| Lily Edge | Advanced | Elegant garments |
Try these, and let your creativity bloom!
Chunky Twist Border

After exploring the delicate beauty of floral lace edging, it's time to switch gears and add a bold touch to your crochet projects with a chunky twist border! This fun design creates a thick, textured finish that really pops. You'll love how easy it is to make!
Here are some ideas to inspire you:
- Use a soft, bulky yarn for extra warmth and comfort.
- Experiment with different colors to match your project's theme.
- Try combining stitches for a unique twist effect!
With just a few simple steps, you'll transform your pieces into eye-catching creations that stand out! Enjoy crocheting!
V-Stitch Edging

V-stitch edging can add a lovely, airy touch to your crochet projects, making them feel both elegant and inviting! To create this beautiful border, you'll need your favorite yarn and a suitable hook. Start by chaining a few stitches, then work a V-stitch—one double crochet, chain one, and another double crochet—all in the same stitch. Repeat this along your edge for a stunning finish! It's a simple technique that gives a delicate look, perfect for blankets or shawls. You'll love how this edging enhances your work, and you'll feel proud of your creation every time you see it! Happy crocheting!
Twisted Rope Border

If you want to add a fun and textured finish to your crochet projects, the Twisted Rope Border is a fantastic choice! This charming border creates a beautiful, rope-like effect that enhances any piece. You'll need basic crochet skills, a hook, and yarn.
- Start with a foundation chain for your border.
- Use double crochet stitches, twisting them together for that rope effect.
- Finish with a slip stitch to secure your border!
Don't be afraid to experiment with different yarn colors or textures. You'll love how the Twisted Rope Border transforms your work into something special! Happy crocheting!
Alternating Color Stripe Edge

When you want to add a splash of color and personality to your crochet projects, the Alternating Color Stripe Edge is perfect for you! This fun technique uses two or more colors that alternate in stripes, creating a vibrant border. Start with your main project and choose colors that complement or contrast beautifully. As you crochet the edge, switch colors every few stitches, keeping your tension even for a neat finish. You'll love how this border enhances your work, making it pop! With just a bit of practice, you'll master this technique and elevate your crochet game! Enjoy the journey!

Keep reading
20 Latest Crochet Neck Warmer Ideas To Try In 2025!
Link up with the 20 best crochet neck warmers that blend warmth and style—discover which designs will transform your winter wardrobe!
20 Amazing Crochet Jewelry Ideas
Amazing crochet jewelry ideas await you, featuring unique designs that will inspire your creativity and elevate your accessory game to new heights.
20 Amazing Crochet Kit Ideas
Navigate through 20 amazing crochet kit ideas that spark creativity and joy; discover the perfect project to ignite your crafting passion!
Need personal guidance?
Talk to an advisor
Our care experts are here to help you make the right choice — for free.