15 Best Wallet Sewing Ideas You Need To Try!
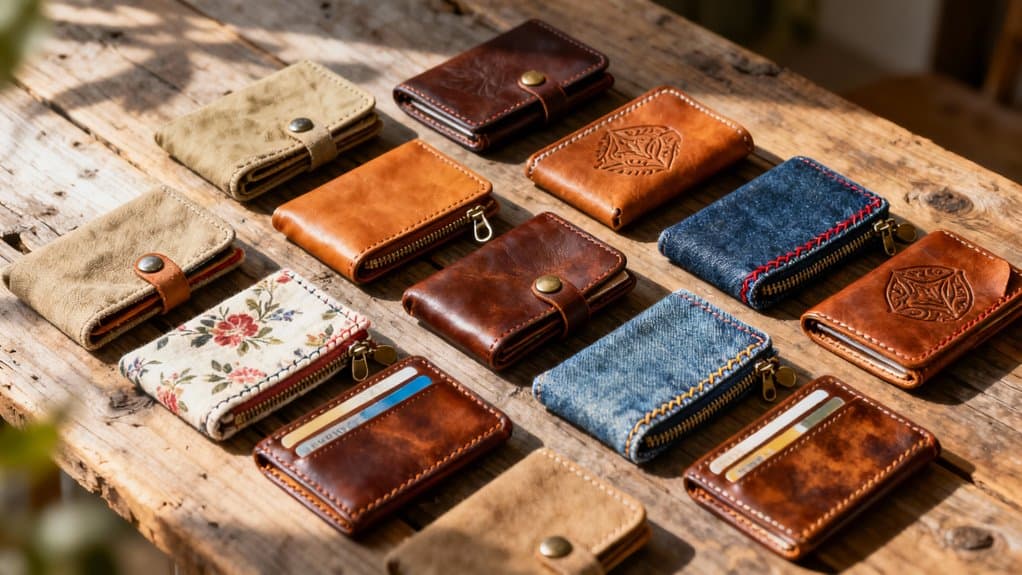
I've been sewing wallets for years, and I can tell you there's nothing quite like pulling out a handmade piece that perfectly fits your needs. Whether you're drawn to classic leather bifolds or modern minimalist designs, these 15 projects will transform how you carry your essentials. I've tested each style myself, from beginner-friendly slip pockets to advanced curved flap designs, and I'm excited to share what I've learned so you can create something truly unique.
Key Takeaways
- Classic bifold wallets use full-grain leather with 6-8 card slots, while minimalist card holders offer slim profiles for 4-8 cards.
- Intermediate projects include coin pouch wallets with zipper dividers and accordion gussets for expandable storage capacity.
- Advanced designs feature long wallets with phone pockets, magnetic snaps, and gusseted expandable compartments for maximum functionality.
- Eco-friendly options utilize cork fabric, upcycled denim patchwork, or leather-canvas hybrids for sustainable, water-resistant wallets.
- Beginner-friendly slip pocket wallets require basic materials and complete in under an hour with simple topstitching techniques.
Classic Bifold Wallet With Card Slots

The classic bifold wallet has earned its place as the cornerstone of leather sewing projects—and for good reason. I've found that working with full-grain leather measuring 4.1–4.5 inches wide creates that perfect pocket-sized companion. When I sew bifolds, I always use marine-grade thread—it's absolutely essential for longevity.
Here's what I include: 6-8 card slots arranged in two rows, plus one full-length currency compartment. After breaking in, each slot comfortably holds three cards. I personally buff and polish the edges for that premium finish. Using scraps from other projects can also help minimize waste while adding unique character to your wallet.
The beauty? Your wallet develops character through patina over time. Surface scratches buff right out thanks to leather's natural oils. Pro tip: pre-punched leather kits make excellent starter projects for building fundamental skills before tackling advanced designs. Many kits come with pre-cut and pre-punched leather along with thread, needles, and detailed instructions to guide you through the process.
Minimalist Card Holder for Everyday Carry

Shifting from the traditional bifold to a minimalist card holder completely changed how I approach everyday carry. I now aim for 4–8 cards maximum, keeping my pockets slim and my essentials accessible. I've found that folded construction with layered card slots works brilliantly for efficiency. Incorporating a mix of pouch styles allows for even more personalized options in card holder designs.
When I sew these, I always use double-sided tape to position card slots accurately before stitching—it's a game-changer. Topstitching around edges with a 1/4-inch seam allowance keeps bulk minimal while ensuring durability. I trim corners diagonally for crisp results after turning.
For materials, I recommend Pellon interfacing with cotton for beginners or leather for premium builds. Adding a zippered closure provides secure storage for cash and cards while maintaining the slim profile. Adding a D-ring or snap closure transforms it into a versatile piece that attaches to keys or bags. Best part? I complete each holder in under 30 minutes.
Zippered Accordion Wallet With Multiple Compartments

After mastering minimalist card holders, I discovered accordion wallets offer unmatched organization without sacrificing portability. This design revolutionized my everyday carry with its clever fold-and-press technique that expands to reveal six dedicated card slots, a central zippered coin pocket, and separate cash compartments.
I cut my patterns precisely from sturdy canvas, measuring approximately 4¾" wide by 3½" high by 1¼" deep when finished. The accordion folds compress into a surprisingly slim profile that fits my small crossbody bag perfectly. Using sustainable materials not only enhances durability but also adds a unique aesthetic touch to your wallet.
Installing the zipper required careful layering of outer fabric and lining, but topstitching around edges secured everything beautifully. I added metal snap buttons for quick access to my most-used cards. The lightweight construction handles daily use effortlessly while keeping coins, receipts, and cards neatly separated. For those who prefer visual guidance, a comprehensive video tutorial walks through each construction step in detail.
Clutch Wallet With Detachable Wristlet Strap

When I needed a wallet that could shift seamlessly from quick grocery runs to evening outings, I designed this clutch wallet with a detachable wristlet strap that's become my go-to pattern.
I cut fabric strips 3–4 inches wide by 13–16 inches long, creating straps that finish around 6–7 inches. The secret's in the construction: I fold the strip lengthwise, press edges to the center crease, then slide on a swivel snap hook before stitching the short ends together with a ¼-inch seam. After topstitching both long sides, I reinforce near the clasp for durability. Adding structured fabrics like canvas or leather guarantees the strap won't stretch.
I always add side D-rings to my clutch wallets for versatile attachment. Using structured fabrics like canvas or leather guarantees the strap won't stretch. For those wanting even more carrying options, I attach two swivel snap hooks to a longer strap to create a convenient shoulder bag alternative. Now I've got hands-free convenience whenever I need it!
Trifold Wallet With Snap Closure

While detachable straps offer freedom, I've found that sometimes I want something even slimmer—a wallet that slides into my pocket without bulk. That's why I adore the trifold wallet with snap closure—it measures just 3.75" by 4.25" closed, yet opens to reveal four card slots, an inside pocket, and a bill compartment. The design is not only practical but also allows for creative customization through fabric choices and embellishments, making each wallet unique.
I construct mine with 2-3 oz goatskin, layering card slot panels before assembly. The key is precise folding and pressing so everything lies flat. I always reinforce the snap area with extra interfacing—learned that lesson after my first attempt tore! Edge stitching around the perimeter adds durability and professional polish.
Test your snap placement before attaching permanently. Double-sided tape holds layers steady during sewing, and mitred corners create those crisp folds I love. For added structure and longevity, consider using Decovil light interfacing throughout the wallet body.
RFID-Blocking Secure Travel Wallet

The moment I started traveling internationally with contactless credit cards, I realized my financial data was vulnerable to digital pickpockets. That's when I discovered RFID-blocking wallets, which use materials like aluminum foil, copper mesh, or conductive fabrics sewn into the lining to create a protective Faraday cage. I integrated thin aluminum sheets between fabric layers in my travel wallet design, ensuring slim portability without bulk. For enhanced protection, I've experimented with specialized metalized fabrics that block both high-frequency payment cards and passport chips. The construction requires precise stitching around the RFID layer to maintain barrier integrity. Creative sewing ideas for wallet designs can further enhance functionality and style. Now I confidently navigate crowded airports and metro stations knowing my cards can't be scanned remotely. Crowded malls and public transportation are particularly vulnerable hotspots where criminals use portable scanners to steal card information without detection. This practical security upgrade transformed my nervous travels into worry-free adventures.
Simple Slip Pocket Wallet for Beginners

After years of tackling complex sewing projects, I've discovered that a simple slip pocket wallet remains my favorite recommendation for absolute beginners.
I love how this project requires just exterior fabric, lining, interfacing, and thread—nothing intimidating. You'll place fabrics right sides together, sew around the edges leaving a turning gap, then trim corners for crisp results. After turning and pressing, topstitch to close the opening and secure everything. For those looking to elevate their skills, this project can serve as a perfect introduction to creative backpack projects that involve similar techniques.
The magic happens when you fold the fabric to create slip pockets. I always mark placement with a fabric pen first—precision matters here. Edge stitching reinforces durability while preventing fraying. For added strength and durability, consider using medium-weight fusible stabilizer on your fabric pieces.
What excites me most? You'll finish in under an hour. Practice on scraps first, master that 1/4-inch seam allowance, and soon you'll be customizing sizes and adding decorative touches effortlessly.
Coin Pouch Wallet With Zipper Divider

Once you've mastered the slip pocket wallet, I'm thrilled to introduce you to a coin pouch wallet with a zipper divider—a game-changer for keeping loose change corralled. I adore how the zipper wraps around the entire wallet, securing every penny inside. The divider, stabilized with interfacing, creates dedicated sections for coins, bills, and cards—no more digging through chaos!
I recommend using cotton or canvas with a nylon zipper. Fuse interfacing to your divider piece first, then construct accordion gussets for expandability. When installing the zipper, pin carefully to prevent lining interference. I learned this the hard way after battling bunched fabric! Additionally, consider using sustainable fabric choices which not only help the environment but also add unique flair to your wallet.
The compact size slips perfectly into my bag, and topstitching along edges adds professional polish. Customize with waterproof lining or contrasting fabrics for personality. Consider making multiple wallets at once by creating paper or cardboard patterns for easy and consistent cutting.
Long Wallet With Phone Pocket

When I first discovered long wallets with phone pockets, I ditched my bulky purse for good—everything I need fits in one sleek package!
I typically cut mine to 19.5 cm x 12 cm x 3.5 cm deep, perfect for modern smartphones. My favorite design includes 12 card slots, a zippered coin pocket, and two slip pockets for receipts. I always use cork or leather to prevent fraying—they're incredibly durable.
The key is layering fusible fleece for structure and installing magnetic snaps with reinforced stitching. I position the phone pocket under a secure flap, ensuring nothing slips out. Edge-coating techniques give that professional finish I love.
I've added d-ring tabs to convert mine into a wristlet for hands-free convenience. The best part? Free patterns with video tutorials make this project surprisingly beginner-friendly! I recommend working with non-fraying materials like cork, vinyl, or faux leather since they require minimal edge finishing and create a polished look right away.
Cork Fabric Minimalist Wallet

Cork fabric revolutionized my wallet-making game—it's naturally water-resistant, antimicrobial, and doesn't fray at the edges, which means I can skip linings and finish seams with raw edges for that sleek, modern look. I design mine with 2–4 card slots and one slip pocket for bills, secured with a magnetic snap or elastic band. The best part? I complete these wallets in under an hour using just 9" x 27" of fabric and a standard 80/12 needle. I love adding decorative topstitching with contrasting thread to define the edges. Cork comes in gorgeous natural tones and prints, making customization endless. Plus, it's vegan and sustainably harvested—my customers appreciate knowing their wallets are eco-friendly while staying incredibly durable through daily use. For beginners looking to start their cork wallet journey, there's a free downloadable template that makes the process even easier.
Upcycled Denim Patchwork Wallet

I've fallen hard for upcycled denim patchwork wallets because they transform worn jeans into something functional while keeping thousands of liters of water's worth of textile waste out of landfills. I start by cutting denim scraps into a 14 cm x 23 cm rectangle, then fuse interfacing to add structure. My favorite part is arranging different denim shades into patchwork patterns—each wallet becomes completely unique. I stitch the pieces together, add a lining, then sew in an 11 cm zipper for secure closure. The final 9 cm x 13 cm wallet folds perfectly into my pocket. Last month, I attached a D-ring to one design, converting it into a wristlet. Denim's durability means these wallets outlast synthetic alternatives while costing practically nothing to make.
Leather and Canvas Hybrid Wallet

Since discovering leather and canvas hybrid wallets, I've realized they offer the perfect middle ground between rugged durability and everyday flexibility. I use 3-4 oz vegetable-tanned leather for exterior panels and waterproof canvas for the core body, creating a slim profile that fits comfortably in my front pocket.
My construction process involves beveling leather edges, then burnishing with gum tragacanth for that professional finish. I punch 45-degree corner holes before saddle stitching, ensuring clean, strong seams. Contact cement bonds the materials temporarily while I work.
I typically design four card slots using canvas for flexibility, while leather corners protect high-stress zones. The canvas creates a natural "living hinge" that eliminates bulky hardware. This combination dramatically reduces weight compared to all-leather wallets. One yard of fabric allows me to create multiple wallet projects, making it cost-effective to produce several pieces in a single sewing session.
Curved Flap Wallet With Magnetic Closure

The elegant sweep of a curved flap wallet transforms an everyday carry item into something that feels custom-made for your hand. I've found that achieving this professional curve requires careful notching around seam allowances—pinking shears work beautifully here. The magnetic closure is where precision matters most. I always mark my snap insertion points with a ruler before making clean incisions with a seam ripper. Here's my technique: sandwich the magnet between layers using strong adhesive first, then stitch everything down to prevent shifting. I recommend 0.5mm cover thickness for ideal magnetic function. The secret? Fuse woven interfacing to your flap's wrong side before installing hardware. This protects against abrasion at stress points. After several projects, I've learned that proper reinforcement makes these wallets incredibly durable for daily use.
Gusseted Expandable Wallet Design

When you're ready to elevate your wallet-making skills beyond flat constructions, gusseted expandable designs offer that perfect blend of compact elegance and surprising capacity. I'll admit, my first gusseted wallet looked slightly wonky—those accordion-style side panels require precise mitering and careful alignment at the top edges. Here's what I've learned: use clips to secure everything before stitching, and don't skip skiving thick leather for flexibility. The magic happens when those expandable compartments transform a slim profile into a multi-pocket powerhouse holding cards, coins, and bills. I particularly love adding a floating center panel with partial stitching for pass-through access. Consider combining different patterns from your previous projects, as mixing design elements can create new wallet variations tailored to specific use cases. Yes, it's more advanced than basic construction, but watching those gussets expand wide for easy visibility makes every painstaking measurement worthwhile.
Compact Keychain Card Holder Wallet

If you're drowning in bulky wallets but still need essentials accessible at a moment's notice, the compact keychain card holder will revolutionize your everyday carry. I've sewn dozens of these 4" x 3" wonders, and they're perfect for holding 3–5 cards plus folded cash.
I use cotton quilting fabric backed with fusible interfacing for structure that withstands daily abuse. The secret is precise card pocket placement—mark your layers carefully before assembly. Sew a fabric loop into the side seam, add a D-ring, and attach your closure (I prefer KAM snaps for durability).
This 30-minute project devours fabric scraps beautifully. I've personalized them with embroidery for teacher gifts and batch-sewed twenty for craft fairs. The compact design clips onto keys or lanyards, eliminating frantic purse-digging forever. These pouches work wonderfully for college supplies or food, making them ideal graduation presents.
Conclusion
I've absolutely loved sharing these wallet designs with you! Each project has taught me something new about precision and creativity. Whether you're stitching your first simple card holder or tackling that complex accordion wallet, remember—I started exactly where you are now. Don't stress over imperfect seams; they're part of your journey. Grab your fabric scraps, fire up that machine, and let's create something amazing together. You've got this!
Keep reading
20 Latest Crochet Neck Warmer Ideas To Try In 2025!
Link up with the 20 best crochet neck warmers that blend warmth and style—discover which designs will transform your winter wardrobe!
20 Amazing Crochet Jewelry Ideas
Amazing crochet jewelry ideas await you, featuring unique designs that will inspire your creativity and elevate your accessory game to new heights.
20 Amazing Crochet Kit Ideas
Navigate through 20 amazing crochet kit ideas that spark creativity and joy; discover the perfect project to ignite your crafting passion!
Need personal guidance?
Talk to an advisor
Our care experts are here to help you make the right choice — for free.