15 Best Pant Sewing Ideas You Need to Try
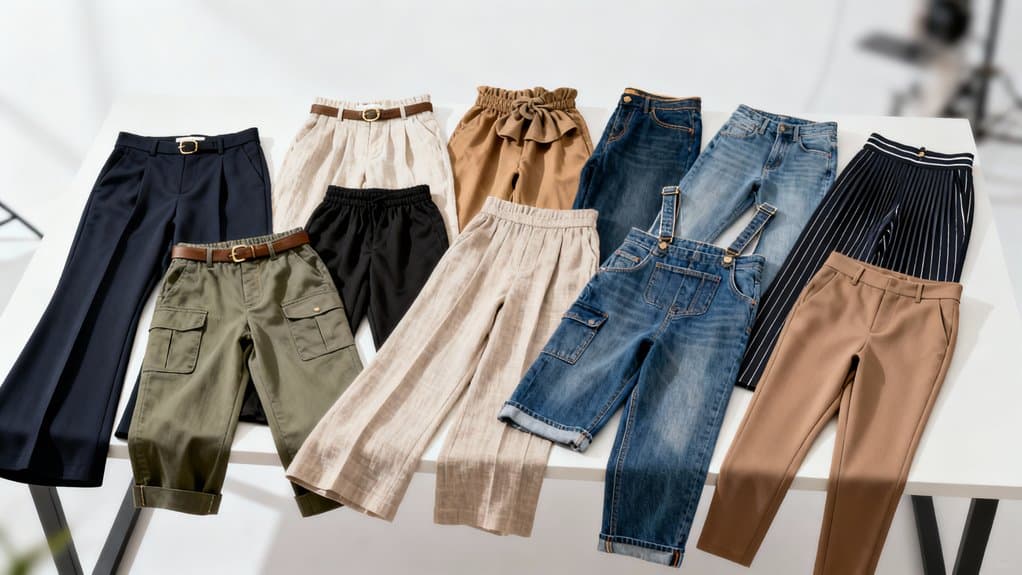
I've been sewing pants for years, and I'll be honest—there's nothing quite like slipping into a pair you've made yourself. The fit is *chef's kiss*, and you can customize every detail to match your style. Whether you're drawn to wide-leg silhouettes or prefer something more tailored, I've gathered my favorite patterns that'll transform your wardrobe. Some are surprisingly beginner-friendly, while others will challenge even experienced sewists. Let me show you what's possible when you take control of your closet.
Key Takeaways
- Wide-leg utility pants and tapered trousers offer flattering silhouettes for various body types and versatile styling options.
- Pull-on ponte knit pants provide comfort with polished appearance, requiring zero ease and elastic waistband construction techniques.
- Color-blocked pants using mixed fabric scraps create unique, high-end designs with asymmetrical patterns and custom style.
- Cargo pants feature functional elements like pencil pockets, hammer loops, and flat fell seams for workwear durability.
- Lined patch pockets with double topstitching and bar tacks enhance durability while providing professional, finished appearance.
Wide-Leg Utility Pants With Structured Waistband

I've been obsessed with wide-leg utility pants ever since I discovered how flattering they are on nearly every body type—and the best part? They're surprisingly straightforward to sew! I always reach for lightweight fabrics like cotton or linen because they drape beautifully and keep me comfortable all day.
The structured waistband is where these pants really shine. I cut fusible interfacing to size and attach it for that professional finish. Then I create elastic channels by sewing 1.5 cm and 3.2 cm from the top—this gives me an adjustable fit that's forgiving yet polished. I always use 3-ply polyester thread because it provides the durability needed for pants that will get plenty of wear.
Adding cargo tabs and belt loops transforms basic trousers into functional statement pieces. I cut five belt loops at 7.5 cm each, fold the edges inward twice, and press them crisp before attaching.
Tapered Leg Trousers for a Modern Silhouette

When I'm looking for pants that work from morning meetings to weekend brunches, tapered leg trousers are my absolute go-to. The gradual narrowing from knee to ankle creates this incredible streamlined effect that makes my legs look miles longer without feeling restrictive through my hips and thighs.
I've sewn them in lightweight cotton for summer and wool blends for winter—both versions shift seamlessly between dress codes. What I love most is how they balance comfort with sharp tailoring. There's enough room where I need it, but the clean lines maintain that polished look.
They're universally flattering too. Whether I'm pairing them with loafers for work or sneakers for casual days, the tapered silhouette draws attention to my footwear while creating those enviable proportions everyone wants. This style gained major momentum in the 1950s and 1960s when fashion icons made it their signature look, and it's remained a wardrobe staple ever since.
Pull-On Ponte Knit Pants With Elastic Waist

There's something magical about pants that feel like pajamas but look polished enough for actual human interaction. That's exactly what I discovered when I made my first pair of pull-on ponte knit pants with an elastic waist.
Here's what shocked me: you need zero ease in ponte patterns—typically 4 inches less than your body measurement. The fabric's natural stretch does all the work.
I recommend testing your fit with muslin first, paying special attention to the crotch curve. For construction, I serge my seams and reinforce stress points with straight stitching. The elastic waistband technique is straightforward: cut your elastic 5 inches shorter than your waist, then zigzag stitch it while stretched. After securing the elastic, steam it to shrink back into its proper shape for a professional finish.
The result? Pants that actually drape beautifully while moving with you.
Cropped Linen Pants for Summer Comfort

Last summer, after sweating through yet another pair of synthetic pants, I finally understood why sewists rave about cropped linen pants. The breathability alone makes linen superior for hot weather, and that breezy crop length pairs perfectly with sandals.
I love how forgiving the construction is. An elastic waistband eliminates fussy closures, and wide-leg silhouettes require minimal fitting. I recommend grabbing 2.5 yards of medium-weight linen and pre-washing it to avoid shrinkage surprises.
The sewing process is straightforward: stitch inseams, join the crotch seam, attach your waistband with interfacing, thread elastic through, and hem to your preferred length. My first pair stretched slightly after wearing, so I now cut elastic a bit shorter than half my waist measurement for better hold. These pants work beautifully for beachwear and office attire, making them one of the most versatile pieces in my handmade wardrobe.
Classic Flat Front Pants With Side Zipper

The elegant simplicity of flat front pants with a side zipper makes them one of my go-to projects when I want polished trousers without wrestling with a fly-front extension. I'll interface the pocket opening edge first, then attach the pocket lining with right sides together. After under-stitching two millimeters from the seam line, I trim those seam allowances to half their width for a beautifully flat finish.
What I love most is how the side zipper preserves that clean, streamlined front—no bulky hardware interrupting the silhouette. The shaped waistline adds flattering definition, while deep welt pockets provide functionality without compromising the sleek aesthetic. I always assess the rise before cutting, since higher waistlines are having their moment. Before beginning construction, I always finish raw edges on the front crotch curve to prevent fraying and ensure a professional interior. These versatile pants work everywhere from office meetings to weekend brunches.
Palazzo Pants Using Basic Pattern Block Modifications

When I first discovered I could transform my trusty trouser block into flowing palazzo pants, it completely changed my approach to comfortable yet elegant bottoms.
The process starts with my base trouser pattern, where I mark side seams with colored markers before adding significant width from hip to hem. I measure my favorite palazzo pants at intervals—hem, calf, knee—then transfer those measurements to create that signature swish when walking.
For the waistband, I add 2 inches above the waist seam for a fold-over elastic casing. I quarter both the elastic and waistline, pinning them together for even distribution. Taking in the side seams at the waist while leaving room through hips eliminates bulky gathers.
Always make a muslin first—palazzo proportions need testing before cutting precious fabric! I keep the leg pieces uncut initially, which saves tracing time and allows for easier modifications as I refine the wide-leg shape.
Utility Pants With Patch Pockets and Topstitching

I learned that patch pockets are the soul of utility pants. I draft rectangles with rounded corners, prewash my canvas, and interface the top edge for structure. After serging the edges, I fold and press meticulously—this prep work makes attachment exponentially easier.
Placement matters enormously. I mark with chalk, baste everything down, then topstitch 1/4" from the edge using heavier thread in my needle. Those bartacks at the corners? Non-negotiable. They've saved countless pockets from tearing when I've overloaded them with field notebooks and measuring tape. The beauty of patch pockets is that they're finished on all sides before being attached to the garment's right side, making them surprisingly beginner-friendly despite their professional appearance.
Stretch Panel Jeans With Custom Topstitching Details

Patch pockets taught me precision, but stretch panels force me to think about fabric behavior in motion. I grab my seam ripper and attack the outseam, creating space for panels that'll move with you. My go-to fabric? A 62% cotton, 35% polyester, 3% spandex blend at 190gsm—it's got just enough give without losing structure.
Here's what I've learned: line panels up with your waistband center for perfect symmetry, then use a stretch stitch so your seams don't pop during wear. I always finish with a serger to prevent fraying. The real fun starts with topstitching—I use contrasting thread to highlight those panel seams, turning a functional alteration into a design feature that screams custom craftsmanship. Before attaching anything, I try on the ripped jeans to figure out exactly how much width the panel needs.
Wool Blend Winter Trousers With Dart Adjustments

Winter trousers demand respect—I learned this the hard way after my first wool blend disaster puckered around the hips like a sad accordion. Now I'm obsessed with dart manipulation, and it's transformed everything.
I select wool-polyester blends for durability and pre-treat them religiously. The magic happens with dart adjustments: I divide larger darts into smaller ones, creating balanced volume distribution that actually flatters. Rotating darts toward my hip curves eliminated those annoying drag lines completely.
My favorite trick? Fisheye darts around the thighs remove excess fabric without compromising comfort. I always mark the grainline first before making any alterations—this reference point keeps everything aligned throughout the adjustment process. I always true my patterns after adjustments—symmetry matters more than you'd think. Pair these techniques with proper crotch depth adjustments, and you'll create winter trousers that look professionally tailored instead of homemade.
Color-Blocked Pants Using Mixed Fabrics

My sewing room floor looked like a fabric store exploded last month—scraps of denim in three shades of blue, leftover linen from summer shorts, and that gorgeous rust-colored twill I couldn't resist buying. Instead of letting them gather dust, I traced my favorite pants pattern and drew bold diagonal lines across the front legs. I added seam allowances to each new edge, labeled everything meticulously, and started sewing smaller sections together first. The trick? Matching fabric weight and pre-washing everything prevents wonky seams. I pressed each seam open obsessively, then topstitched for durability. Mixing fabrics let me create a completely custom look that reflected my personal style rather than settling for store-bought designs. When I finally tried them on, the asymmetrical design looked intentional and expensive—not like I was using scraps at all.
Beginner-Friendly Two-Tube Summer Trousers

When I first heard about two-tube trousers, I'll admit I was skeptical—how could pants without a proper crotch seam actually work? But after sewing my first pair from lightweight cotton, I was hooked! These are basically two straight rectangular tubes sewn together with an elastic waistband—no zippers, buttons, or complicated curves. I finished mine in under three hours, and they're perfect for summer heat.
The beauty lies in their simplicity. I chose breezy linen for my second pair, and despite the wrinkles, they look effortlessly chic. You can adjust the length to full, cropped, or shorts. I even upcycled old bedsheets for a third pair, spending almost nothing. They're genuinely beginner-friendly and surprisingly flattering on everyone.
Cargo Pants With Pencil Pockets and Hammer Loops

After mastering simple elastic-waist pants, I decided to tackle something with more personality—and way more pockets. I fell in love with cargo pants featuring pencil pockets and hammer loops—those twisted fabric strips on the left leg that originally held carpenter's tools.
I used mid-weight cotton canvas (around 7 oz) for durability without bulk. The pattern includes six pockets total: two rear, two angled front, and two large cargo pockets with hook-and-loop closures. I downloaded free PDF pattern pieces for the cargo pockets and hammer loop, which I added to my basic pants pattern.
The construction's straightforward—press raw edges under, topstitch everything, and leave side seam edges raw to encase later. I added a flat fell seam below the knee for extra durability and a more authentic workwear finish. These pants blend workwear function with streetwear style perfectly.
Pleated Front Pants Through Pattern Hacking

One pattern hack changed how I approach pants completely: adding pleats to the front. I trace my base pattern, draw a vertical line parallel to the grainline about 1-2 inches from center front, then cut and spread the pieces apart. For subtle pleats, I add 1.5-2 inches; for dramatic volume, I go up to 6 cm.
The magic happens when I secure those pleats 2-5 cm down from the waist—it creates structure while maintaining movement below. I always mock up the hack in scrap fabric first because blending those waistband curves smoothly takes practice. After spreading the pattern pieces, I redraw the grain line centrally through the new pleat section to maintain proper fabric alignment.
Now I customize everything: single pleats for dress pants, double pleats for tailored trousers. The versatility is incredible, transforming basic patterns into sophisticated pieces.
Draped Viscose Pants With Faced Waistband

Since discovering draped viscose pants with faced waistbands, I've become obsessed with this construction method—it's transformed my entire approach to making elegant, comfortable trousers.
The faced waistband eliminates bulk entirely, creating a smooth, minimalist finish that's perfect for tucking in blouses. I always pre-wash my viscose to handle shrinkage, then use a microtex needle to prevent snags on those delicate fibers.
What I love most is how the wide-leg cut maximizes viscose's natural flow. I add back darts and front pleats for shaping without sacrificing that breezy silhouette. A walking foot prevents shifting during construction, while lightweight interfacing reinforces the facing without stiffness.
The result? High-waisted pants that shift effortlessly from coffee runs to dinner dates—versatile, flattering, and surprisingly straightforward to construct. I always finish with bartacks at pocket openings to reinforce these high-stress areas and prevent tearing with regular wear.
Corduroy Pants With Lined Patch Pockets

I'll never forget the first time I topstitched patch pockets onto corduroy pants—the fabric shifted, the nap flattened under my presser foot, and one pocket ended up a full inch lower than the other. That disaster taught me everything about working with corduroy's quirks.
Now I cut all pattern pieces with the nap running downward, pin from the wrong side, and use sharp tools to prevent fraying. Lining my patch pockets changed everything—I cut the lining slightly smaller than the outer pocket, trim seam allowances religiously, and hand-slipstitch the bottom opening closed. The lined patch pockets enclose all raw edges, eliminating the need to pre-fold or miter corners like unlined versions require. Two rows of topstitching at ⅛" and ¼" create professional durability, while bar tacks at top corners prevent tearing. The lined interior eliminates print-through and creates that smooth, polished finish that makes these pants truly special.
Conclusion
I can't wait for you to plunge into these pant-sewing projects! I've sewn at least half of these styles myself, and let me tell you—there's nothing quite like slipping into pants you've made with your own hands. Whether you're reaching for those breezy linen crops or strutting in wide-leg utility pants, you'll feel amazing. So grab your fabric, fire up that machine, and let's create something spectacular together!
Keep reading
20 Latest Crochet Neck Warmer Ideas To Try In 2025!
Link up with the 20 best crochet neck warmers that blend warmth and style—discover which designs will transform your winter wardrobe!
20 Amazing Crochet Jewelry Ideas
Amazing crochet jewelry ideas await you, featuring unique designs that will inspire your creativity and elevate your accessory game to new heights.
20 Amazing Crochet Kit Ideas
Navigate through 20 amazing crochet kit ideas that spark creativity and joy; discover the perfect project to ignite your crafting passion!
Need personal guidance?
Talk to an advisor
Our care experts are here to help you make the right choice — for free.