15 Best Kilt Sewing Ideas You Need To Try!
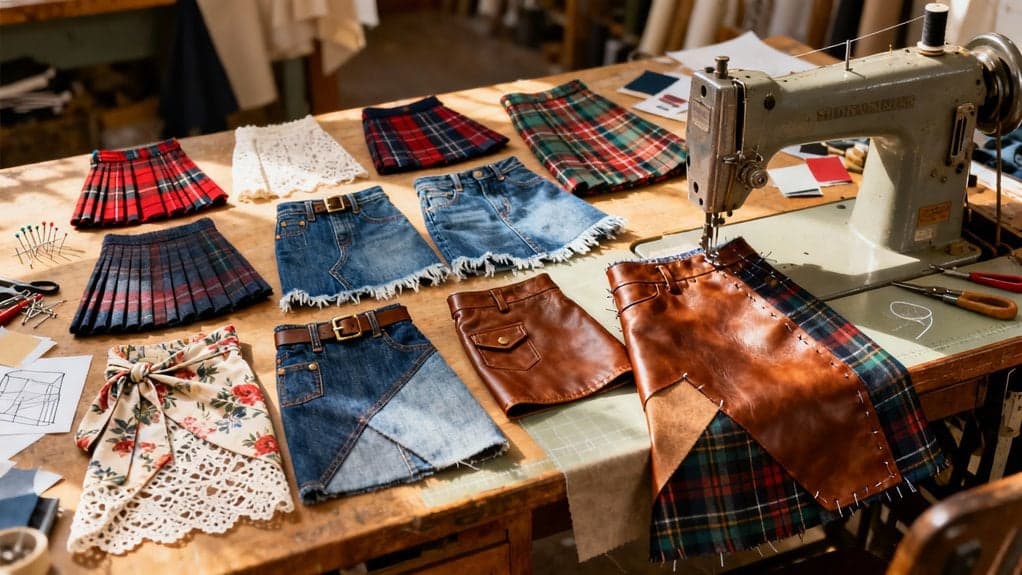
I’ll never forget the frustration of my first kilt attempt—uneven pleats, misaligned tartans, and enough fabric waste to make a second garment. After years of trial and error, I’ve gathered techniques that transformed my sewing from amateur to authentic. Whether you’re crafting your first casual kilt or perfecting traditional Highland dress, these methods will save you time, fabric, and countless do-overs. Let me share what I wish someone had told me from the start.
Key Takeaways
- Center tartan patterns using pivot stripes and cardboard templates to achieve professional-looking, symmetrical pleats that align with fabric motifs.
- Create deep double-width pleats with one-inch faces, starting six inches from apron edge, and trim excess fabric to reduce bulk.
- Choose poly-viscose blends for machine-washable, hypoallergenic kilts that hold sharp pleats, or traditional wool for authentic appearance.
- Add Velcro closures or hidden elastic waistbands to accommodate waist fluctuations and provide comfortable, adjustable fit without bulky hardware.
- Repurpose pleat trimmings into matching accessories like flashes, hat bands, and brooches to reduce waste and showcase clan heritage.
Master Tartan Pattern Centering for Professional Results

When I first attempted to sew a kilt, I learned the hard way that centering the tartan pattern isn’t just a nice touch—it’s the difference between a garment that looks handmade and one that looks homemade.
I now always identify the pivot stripe before cutting anything. I fold the fabric to find that central motif, then mark it with tailor’s chalk I’ve tested on a scrap first. My outer apron gets this center line running straight down the middle—it’s non-negotiable. The outside apron should buckle on the right side for proper kilt construction. Adding decorative touches like embroidery or appliqué can further elevate the overall appearance of your kilt.
Here’s what transformed my work: I use cardboard templates to divide the sett into equal segments, then baste everything twice before sewing. Working on a flat surface prevents that sneaky bias stretch that’ll ruin your symmetry. Trust me, these steps save hours of frustration.
Create the Perfect Deep Double-Width Pleat

After mastering pattern centering, I hit my next major hurdle: creating deep double-width pleats that didn’t look like accordion failures.
I discovered the secret lies in treating each pleat like a playing card in a deck—deeply overlapping with just a narrow face exposed, typically about 1 inch. For my first adult kilt with a 9-inch sett, I calculated pleat width at one-third the sett size, giving me 3-inch faces. An important aspect to consider is fabric selection, as different materials can affect the drape and appearance of the pleats.
Here’s what transformed my technique: I started 6 inches from the apron edge, secured everything with safety pins at the hip measurement, and worked methodically. The cardboard guide I made eliminated guesswork completely.
Don’t skip trimming excess fabric inside from waist to above the hipline—it’s essential for reducing bulk in these deep folds. Consider adding elastic tape inside the waistband to help maintain pleat order and prevent shifting during wear.
Use Cardboard Templates for Uniform Pleat Spacing

I’ll confess—my first attempt at uniform pleats involved a ruler, chalk, and way too much frustration. Then I discovered cardboard templates, and everything changed.
These simple guides divide your tartan sett into equal sections, letting you mark each pleat consistently without remeasuring every single time. I cut mine from heavyweight cardboard to match my sett width, and suddenly my pleats aligned perfectly with the pattern stripes. Using templates for pleats not only enhances accuracy but also ensures a professional finish.
The real magic? Templates work for knife pleats, box pleats, whatever style you’re tackling. They eliminate those annoying measurement errors that waste fabric and ruin symmetry. Before stitching your pleats permanently, pin them in place to check the pattern matching across the entire kilt.
Whether you’re a beginner or seasoned kiltmaker, templates speed up your workflow dramatically. Plus, you can reuse them for future projects, ensuring that crisp, professional look every time.
Add Cargo Pockets for Maximum Utility

Why settle for traditional sporran storage when cargo pockets can transform your kilt into a genuinely functional garment? I’ve found that adding 9-by-28-inch side pockets gives me serious carrying capacity for my phone, wallet, and tools without compromising the kilt’s movement. Adding pockets can enhance the overall utility of the kilt while maintaining its classic style.
Here’s my approach: I construct pockets separately using heavy-duty canvas, reinforcing hems with 1/2-inch folds to prevent fraying. The origami-style folding technique keeps them flat when empty but expands beautifully when loaded.
I prefer snap attachments for side pockets—three evenly spaced snaps hold securely while allowing easy removal for washing. For rear pockets, I sew them permanently at 7-by-15 inches for discreet storage.
The key? Place them away from pleat zones so your kilt maintains its signature swing and aesthetic appeal. Position cargo pockets 3-4 inches down from the waistband at your hip for optimal comfort and accessibility.
Install Velcro Closures for Easy Fastening

Traditional buckles and straps slowed me down for years until I discovered Velcro closures—a game-changer for anyone who wants their kilt on and ready in seconds.
I sew 4–6 inch strips along the inner waistband, positioning them 1.25 inches from the top edge. Reinforced zig-zag stitching at the ends prevents peel-back under tension, and matching thread keeps everything discreet. This approach mirrors the construction essentials used in various garment sewing projects, enhancing durability and functionality.
What I love most is the versatility. Velcro works beautifully with tartan and lightweight twill, eliminates bulky hardware, and accommodates waist fluctuations without adjustment. It’s perfect for utility kilts, performance wear, or quick-change situations.
Just avoid thick canvas—it reduces grip. Clean the hook-and-loop regularly by removing trapped lint, and you’ll maintain that satisfying secure closure for years. When positioning your Velcro, remember that the traditional kilt sits just below the rib cage for proper drape and comfort. This simple modification transformed how I approach kiltmaking.
Pleat to Sett vs. Pleat to Stripe Techniques

Once you’ve mastered the mechanics of kilt construction, the pleating method becomes your signature—and I learned this the hard way after spending 12 hours on my first kilt only to realize the back looked nothing like what I’d envisioned.
Pleat to sett aligns pleats to replicate the full tartan pattern across the back, creating seamless continuity. It’s traditional, gorgeous, and requires 8–9 yards of fabric with 25–34 pleats. You’ll invest more time matching patterns, but the heritage value for clan events is unmatched. This approach delivers a timeless and classic appearance that makes it the preferred choice for formal occasions. Additionally, achieving a professional finish often involves using essential tools and notions to ensure every detail aligns perfectly.
Pleat to stripe centers one prominent vertical stripe within each pleat, creating bold contrast between front and back. It’s more economical, faster, and popular for military kilts.
I’ve tried both—sett pleating for formal occasions, stripe for modern utility kilts. Choose based on your tartan and purpose.
Craft a Fringed Apron Edge for Texture

When I first attempted a fringed apron edge, I underestimated how much that narrow band of unraveled threads would alter the entire kilt—it added depth, authenticity, and a whisper of movement that no plain hem could match. Choosing the right suitable fabrics is essential for achieving the desired effect.
I’ve found wool and wool blends work best since they fray consistently without falling apart. Start by folding your apron fabric and stitching a secure seam along a single thread line. Then pull out threads carefully to create your fringe—usually about 3/8 to 1/2 inch works perfectly.
Use a whip stitch at the change point to prevent uncontrolled unraveling. Remember to complete fringing after assembling your apron so everything aligns properly with your pleats. The fringe should cover that last pleat seamlessly, creating visual continuity across your tartan pattern. Ensure the first pleat on the right side is properly covered by positioning the apron edge fringe precisely.
Apply Decorative Top-Stitching With Metallic Thread

Metallic thread transformed my first attempt at decorative top-stitching from hesitant experimentation into pure eye candy—those glinting lines caught the light with every movement and elevated my tartan from handmade to heirloom quality.
I quickly learned that metallic thread demands respect. I switched to a topstitch needle and lowered my tension settings considerably. Testing on scraps saved me heartache—metallic thread shreds easily with dense patterns or tight tension. The importance of using knit-friendly needles cannot be overstated when working with delicate threads like metallic.
I stitch slowly now, using tear-away stabilizer underneath and maintaining a 3-4mm stitch length. This prevents puckering while letting the metallic shine. I’ve outlined pleats, emphasized waistbands, and added Celtic motifs along apron edges. The blind stitch foot gives me the adjustable guide I need to keep those decorative lines perfectly parallel to my kilt’s edges.
My best tip? Keep extra thread handy. Breakage happens. But when you press that finished piece from the reverse side, protecting that gorgeous sheen, you’ll forget every frustrating moment.
Incorporate Belt Loops With Reinforced Stitching

After ruining my first handmade kilt by having the belt loops rip clean off during a Highland games competition, I’ve become obsessive about reinforced stitching—and I’m not embarrassed to admit it.
I cut my belt loop strips 1 inch wide, fold the raw edges to the center, and press them until they’re crisp. After sewing both edges, I cut them into 4-inch pieces—slightly longer than my waistband width.
Here’s where I get serious: I position 5-7 loops strategically at the apron edges, hips, and center back. Then I bar tack each end multiple times. Sometimes I add zigzag stitching over straight stitches for extra insurance.
Trust me, your sporran chain will thank you later. I always make sure to leave 1/8″ of ease in each loop so my belt can slide through without binding or putting stress on the attachment points.
Try Tapered Pleats for a Contemporary Silhouette

If you’ve ever felt like traditional kilts add unnecessary bulk around your middle, tapered pleats might be your game-changer. I’ve found that angling pleats from hip width to waist width creates a streamlined silhouette that’s both flattering and comfortable.
Here’s my approach: I calculate the taper mathematically—typically starting at 1″ at the hip and narrowing to 0.86″ at the waist. I chalk everything before sewing, then carefully handsew each pleat to maintain alignment. Yes, it’s around 3000 stitches, but the result is worth it.
I remove excess fabric inside the pleats and add canvas reinforcement for structure. The payoff? A contemporary kilt that moves beautifully, reduces gathering at the waist, and preserves your tartan’s pattern integrity. Quality kiltmakers aim to create kilts designed to last by evaluating your body shape initially, ensuring both the perfect fit now and the ability to make alterations in the future.
Add Embroidered Clan Crests for Personalization

When I first embroidered my family’s clan crest onto a kilt I’d sewn, the transformation felt profound—what had been beautiful fabric became something deeply personal.
Each Scottish clan has its own unique crest and motto, making this detail truly one-of-a-kind. I’ve found that positioning the crest on the flap or sporran area works beautifully, though some prefer placing it near the waistband.
You don’t need to be Scottish to embrace this tradition—many people honor their ancestry or simply appreciate the historical significance. The embroidery itself can be done by hand or machine, depending on your skill level and patience. For background areas around the crest, consider using a plaid filling stitch that mirrors the tartan pattern of your chosen clan.
I’ll tell you this: nothing beats wearing a kilt that carries your heritage stitched directly into its fabric. It transforms a garment into a legacy piece.
Work With Poly-Viscose Blends for Durability

Though I’ve always loved the authenticity of wool, I’ll admit that poly-viscose blends revolutionized my kilt-making once I gave them a fair chance. The fabric resists abrasion beautifully, holding sharp pleats through countless wears without fading or pilling. I’ve found it incredibly forgiving for beginners since it’s machine washable and hypoallergenic—no more worrying about wool allergies or expensive dry cleaning bills.
The silky texture drapes wonderfully while staying cooler than traditional wool, making it perfect for summer events or dance performances. This combination of polyester and rayon creates a cost-effective alternative that mimics wool’s appearance without the premium price tag. Best of all, the cost savings let me experiment with bold tartans I wouldn’t risk on pricey wool. For children’s kilts or your first sewing project, poly-viscose delivers authentic looks with practical durability that’ll withstand real life.
Create Adjustable Waistbands With Hidden Elastic

After wrestling with kilts that felt perfect in the morning but uncomfortably snug by evening, I discovered the game-changing magic of hidden elastic waistbands.
I construct mine using six fabric pieces with two elastic lengths that slide through openings in the front waistband. The elastic stays completely invisible while allowing 2-3 inches of expansion—perfect for accommodating weight fluctuations or simply sitting comfortably.
Here’s my favorite technique: I sew buttonholes directly into the elastic at 5 cm intervals, then attach flat buttons I can reposition as needed. This gives me multiple adjustment points without compromising the kilt’s appearance. Before securing, I twist the elastic to ensure it lays completely flat when the waistband is turned to the inside.
The key is keeping elastic flat during construction and securing ends with edge-stitching. Whether you’re making utility or traditional kilts, this method maximizes garment lifespan while maintaining visual integrity.
Use Contrasting Threads in Hidden Seams

I stumbled onto contrasting thread in hidden seams completely by accident—I’d grabbed the wrong spool while constructing a Black Watch kilt and decided to keep stitching anyway. That mistake became my favorite trick. The bright thread made inspecting my seams ridiculously easy, catching skipped stitches before they became problems. I now deliberately choose contrasting colors for all internal construction.
Beyond functionality, it’s become my signature detail. I’ll match the thread to a clan accent color or family tartan shade, creating an insider’s secret only I know exists. When pleats shift during movement, you’ll catch tiny flashes of that hidden color—subtle but intentional. It’s bespoke craftsmanship that doesn’t compromise traditional appearance while adding personal meaning. If you want expert guidance on construction techniques, the Professional Kiltmakers section offers invaluable advice from experienced craftspeople. Try using contrast thread in your next waistband seam and watch your construction quality improve immediately.
Repurpose Pleat Trimmings for Matching Accessories

When my shears slice through kilt pleats during adjustments, I used to toss those tartan strips into a scrap bin without thinking twice. Now I realize those trimmings are goldmines for matching accessories.
I’ve transformed pleat remnants into kilt flashes, hat bands, and bag trims that perfectly coordinate with my kilts. The key is trimming evenly with sharp shears and finishing edges with fray-check to prevent unraveling. I always inspect for wear or fading before repurposing—durable woolen tartans work best.
Beyond reducing waste and saving money, these accessories let me carry clan heritage in subtle ways. I’ve even made keychains and brooches with tartan inserts. Check pattern alignment when stitching, and you’ll create professional-looking pieces that extend your kilt’s identity beautifully. Many kilt-wearing enthusiasts share their creative repurposing ideas through online communities dedicated to kilt culture.
Conclusion
I’ve found that mastering these kilt sewing techniques has completely transformed my craft, and I’m confident they’ll do the same for you. Don’t be intimidated if your first attempts aren’t perfect—I’ve certainly had my share of wonky pleats! Start with one technique that excites you most, practice it until you’re comfortable, then move on to the next. You’ll be amazed at how quickly your skills develop. Now grab that fabric and let’s get sewing!

Keep reading
20 Latest Crochet Neck Warmer Ideas To Try In 2025!
Link up with the 20 best crochet neck warmers that blend warmth and style—discover which designs will transform your winter wardrobe!

20 Amazing Crochet Jewelry Ideas
Amazing crochet jewelry ideas await you, featuring unique designs that will inspire your creativity and elevate your accessory game to new heights.

20 Amazing Crochet Kit Ideas
Navigate through 20 amazing crochet kit ideas that spark creativity and joy; discover the perfect project to ignite your crafting passion!
Need personal guidance?
Talk to an advisor
Our care experts are here to help you make the right choice — for free.