15 Best Hood Sewing Ideas You Need To Try!
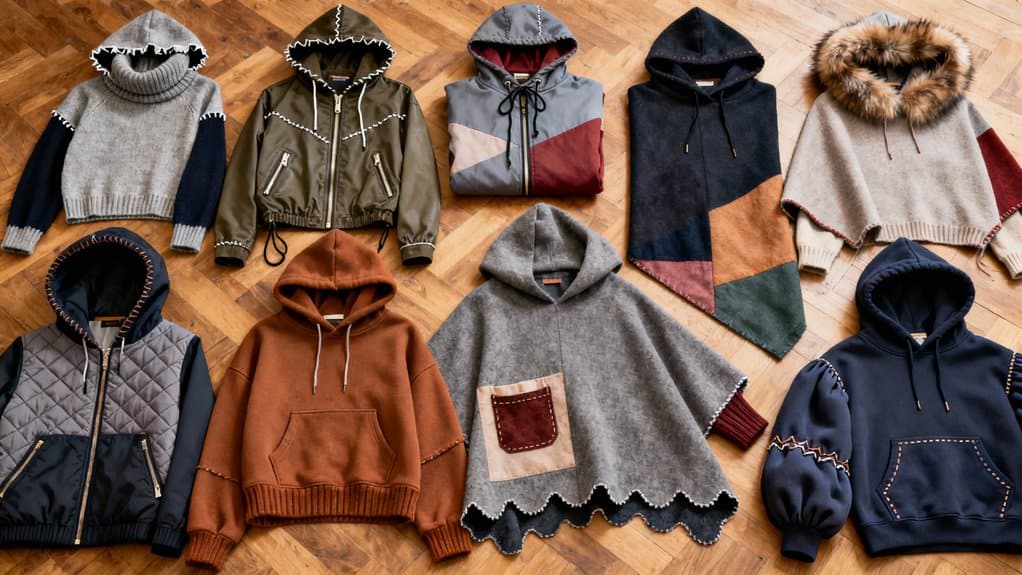
I’ve been sewing hoods for over a decade, and I can tell you—they’re what make or break a garment’s functionality. Most sewists stick to basic two-piece patterns, but there’s a whole world of techniques that’ll transform how your hoods fit, drape, and perform. From hidden pockets to ventilation systems, these aren’t just aesthetic upgrades. They’re practical solutions I wish I’d discovered years earlier. Let me walk you through the methods that actually matter.
Key Takeaways
- Three-piece hood design with center panel creates superior fit, contour, and wind protection through vertical height and crown shaping.
- Custom two-piece hood drafting allows control over neckdrop depth and personalized fit adjustments with muslin testing.
- Double-layer construction with adjustable drawstrings traps air for warmth while grommets and topstitching add functionality.
- Decorative stitching techniques like blanket stitch, metallic threads, and mixed-media edges create unique, personalized hood designs.
- Ventilation grommets and mesh inserts improve breathability, reducing moisture buildup in performance hoodies and outdoor gear.
Three-Piece Hood Pattern for Superior Fit and Contour

I’ll admit it—the first time I drafted a three-piece hood, I questioned whether the extra seam was worth the effort. Then I tried it on. The difference was immediate—no more fabric flopping awkwardly or gaps around my neck. That center panel creates vertical height and crown shaping that two-piece hoods simply can’t match. This design is particularly beneficial for those who want to explore advanced hoodie variations like lined and reversible options.
Here’s my approach: I pin the center panel to one side piece first, right sides together, using consistent 1/4″ seam allowances. Then I attach the opposite side. Aligning notches guarantees symmetry. I always overlap the front ends slightly at the neckline for better drape.
The contour hugs your head naturally, making it ideal for outdoor garments where wind protection matters. I use a flexible measuring tape to check the curve measurements before cutting, ensuring the wedge piece will fit perfectly between the side panels. Trust me—once you experience this fit, you won’t go back.
Add Facings for a Professional Clean Edge Finish

When I first learned that facings could transform a hood from homemade-looking to store-bought polished, I kicked myself for all those years of exposed seams. Now I always cut my facing from lightweight cotton poplin, using fusible interfacing for structure without stiffness.
I staystitch curved edges first to prevent stretching, then pin the facing right sides together with my hood, matching every notch precisely. After sewing, I clip notches carefully and understitch about 1/8″ from the edge—this keeps the facing from rolling outward. Instead of backstitching at the ends, I hand knot the threads for a cleaner, more polished finish.
The game-changer? Grading those seam allowances to eliminate bulk. Additionally, using suitable materials can enhance the overall look and functionality of your hood. I finish by hand-tacking the facing at shoulder seams and pressing everything flat. Small print fabrics hide any wobbly stitching beautifully.
Wedge Insertions to Transform Your Hood Silhouette

The first time I inserted a center wedge into a hood pattern, I couldn’t believe how much volume and shape it added—suddenly my flat, pancake-like hood became dimensional and actually framed my face instead of collapsing against it. I measured down 3 inches from the top front and 2 inches at the side bottom, drawing a dotted line along the hood curve. After cutting my wedge piece—3.5 inches at top, 2.5 inches at bottom—I folded fabric on the left side for symmetry. I pinned the wider end at the hood top with right sides together, sewed around each curve with 1/4 inch seams, then pressed everything toward the center. Top stitching reinforced those seams beautifully while adding decorative detail. I finished the inside seams with bias binding for a clean, professional look that prevented fraying. Adding a wedge not only enhances the aesthetic but also allows for customization ideas that can truly personalize your hood.
Draft a Two-Piece Hood With Custom Neckdrop Depth

After years of wrestling with hoods that either strangled me or gaped awkwardly at my collarbone, I finally learned that drafting a two-piece hood with a custom neckdrop depth gives me complete control over how the hood sits on my shoulders and frames my face. I start by tracing half my garment’s front and back neckline to establish the base. Then I adjust the neckdrop—lowering it by extending the bottom edge for relaxed drape, or raising it for a snugger fit. I always smooth the alteration curves carefully before cutting. The two identical side panels join at the center seam, creating that essential head space. I measure from the center back over my head to my eyebrows to determine the hood’s proper height. Testing with muslin first saves me from wasting good fabric and guarantees the perfect fit I’ve been chasing. Incorporating sewing techniques like box corners and topstitching can enhance the overall structure and durability of your hood design.
Create a Double-Layer Hood With Hidden Internal Edges

Since discovering the bagging technique five years ago, I’ve never looked back to exposed seam finishes inside my hoods. I sew both outer and lining pieces separately, then align them right sides together around the front edge. After stitching, I trim allowances and clip curves before turning everything through the neckline opening.
The magic happens with understitching—I stitch the seam allowance to the lining side, preventing it from rolling out. For crisp edges, I always interface the face edge and use a point turner. When I’m feeling fancy, I’ll insert flat piping between layers for contrast. For structured historical reproductions, I attach millinery wire with whip stitch to add shape and stability to the hood’s frame. Additionally, using a projector can help you resize patterns directly to achieve the perfect fit for your hood design.
I secure the neckline with hand-stitching or integrate it into the collar. This method gives you professional-looking hoods with zero visible raw edges inside.
Install Adjustable Drawstring Channels for Versatile Wear

Beautiful hood construction deserves equally thoughtful functionality, which is why I always plan for drawstrings early in my process. I create my channel by folding fabric or stitching bias tape near the hood edge, leaving a small gap for insertion. I thread cotton twill tape or nylon cord using a safety pin—it’s quick and prevents frustration. For activewear, I love combining elastic portions with standard cord for grab-and-go ease.
Incorporating customization options allows for unique designs that enhance the overall look of the garment. I always reinforce my buttonhole openings with extra stitching after learning this lesson the hard way on a child’s jacket. Adding cord stops makes one-handed adjustment possible, which you’ll appreciate on windy days. For a polished look, I topstitch along channel edges and guarantee my channel width allows smooth movement without excess slack bunching. When working with drawstrings for children’s garments, I prioritize safety regarding drawstring placement and follow current guidelines to prevent any hazards.
Design Pointed or Elf-Style Hoods for Fantasy Projects

When I first attempted a pointed hood for my daughter’s forest elf costume, I underestimated how dramatically the angle and length of that peak would transform the entire look. A longer, straighter point delivers that classic fairytale silhouette, while shorter angles create playful pixie vibes.
I recommend fleece for beginners—it’s forgiving, warm, and doesn’t fray. Start by sewing two side panels together, then attach a center seam along the top to sharpen your point. Notch curved seam allowances before turning for smooth edges. For added comfort and style, consider using eco-friendly materials that align with sustainable practices.
For cloaks, measure your neck circumference carefully before attaching the hood. I’ve lined mine with contrasting fabric for durability, though it’s optional. Add embroidered details, faux fur trim, or integrated elf ears to elevate your fantasy project beyond basic construction. You can stuff the pointed tip with polyfill or dryer lint to help it hold its shape and curl naturally.
Build an Enlarged Cowl-Style Hood for Dramatic Winter Appeal

After years of sewing standard hoods that barely skimmed my shoulders, I decided to draft an enlarged cowl-style hood for a winter cloak—and I’ll never go back to those timid patterns. I increased the crown height by 8 cm and widened the face opening, then cut both outer wool and French terry lining on the fold. Adding 0.6 cm seam allowance proved essential for my serger. The double-layer construction traps air beautifully, keeping me warm during snowy hikes. Additionally, using a high-quality fabric for both layers enhances the warmth and durability of the hood.
I installed grommets at the cowl neck with 4 cm square reinforcement patches, threading a drawstring for adjustable coverage. The generous drape fits over my winter hat and creates that dramatic silhouette I’d envisioned. I used a water soluble pen to mark all my placement lines before assembly. It’s functional winter protection with serious visual impact.
Sew a Detachable Hood for Multi-Seasonal Flexibility

Since I live where spring mornings start cold but afternoons turn warm, I’ve sewn detachable hoods onto three of my jackets—and they’ve solved my layering frustrations completely.
I construct each hood from two side pieces and one center piece. After pinning the long centerpiece onto the curved sides, I press seams over my tailor ham to smooth those curves. Then I sew two hood layers together (right sides facing), leaving a 10-15cm opening for turning.
For attachment, I install snaps at the neckline and add two center front buttons. This lets me snap the hood on during chilly mornings and remove it by lunchtime. I’ve even sewn detachable hoods for already-finished coats using free patterns—transforming single garments for multiple seasons without permanent alterations.
I always work with medium weight woven fabrics like twill or light canvas since they hold the hood’s structure beautifully without adding bulk.
Use Contrasting Linings to Enhance Visual Impact

Once you’ve mastered adding hoods to your garments, the next creative leap is choosing a lining that makes people do a double-take. I learned this trick when I lined a charcoal hoodie with bright yellow satin—suddenly, every time I flipped the hood down, friends asked where I bought it.
Start by pairing high-contrast colors: black with white, navy with coral. Attach your outer hood and lining right sides together, stitch along the opening, then turn right side out. Topstitch to keep everything flat and showcase that color pop at the front edge.
For extra flair, I add contrast binding or piping. The real magic happens when someone spots that unexpected flash of pattern or luxe velvet inside—it’s your signature touch. Keep in mind that jersey fabric maintains the stretch you need at the neckline, especially for pull-over styles.
Construct a Reversible Hood for Dual-Look Functionality

When I first flipped a reversible hood inside-out and realized I’d just created two jackets in one, I knew I’d found my favorite sewing challenge.
I cut duplicate pattern pieces from two fabrics with similar weights—matching drape prevents one layer from overpowering the other. I sewed each layer separately, right sides together, then joined them by stitching around the face opening while leaving a turning gap. After inverting the hood, all raw edges disappeared between layers.
I hand-stitched the gap closed invisibly, pressed every seam for crispness, and added low-profile snaps that work from either side. The key? Pre-wash everything and grade seam allowances to eliminate bulk. I extended the pattern by adding a 35-inch scarf section beneath the hood for extra warmth. Now I flip between a bold floral and classic navy whenever my mood shifts.
Add Overlapping Center Fronts for Extra Warmth and Wind Protection

After years of sewing outerwear, I’ve learned that the simplest upgrade for any hood is adding overlapping center fronts—a modification that transforms a basic hood into a genuine wind barrier.
I extend my hood’s center front by 3–6 inches when drafting the pattern, marking new notches at the overlap point. This creates that essential extra fabric layer that blocks drafts around your neck and face—trust me, you’ll notice the difference immediately.
For construction, I stitch the main and lining pieces separately first, then align the overlapped fronts at those notches before staystitching the neckline. Adding snaps or toggles lets you adjust coverage based on conditions. Topstitching can enhance the finished look while securing the overlapped layers.
I’ve experimented with color-blocking the overlap section, which emphasizes this functional feature as a design element while boosting warmth retention considerably.
Incorporate Hidden Pockets or Earbud Channels Inside Hood Panels

While most sewers focus on the outer appearance of their hoods, I’ve discovered that the interior space offers incredible potential for hidden storage and tech integration.
I position small pockets along side seams or near the hood base where they’re easily accessible but won’t interfere with drawstrings. I use lightweight lining fabrics and reinforce openings to prevent sagging. For closures, I prefer flat Velcro or hidden zippers that won’t press uncomfortably against your head. When attaching Velcro, I follow a box-and-cross stitching pattern for the most secure hold.
My favorite addition is earbud channels—narrow fabric tubes stitched along interior seams. I route them following natural hood curves and finish exit points with small buttonholes. This keeps cords organized without dangling.
I always choose anti-static linings to protect electronics and add reflective trim inside pockets for nighttime visibility.
Embellish Hood Edges With Bias Tape, Piping, or Decorative Stitching

Hidden features make a hood functional, but the edges define its personality. I’ve transformed plain hoods into statement pieces using bias tape—it curves beautifully around edges and prevents fraying. I wrap double-fold tape around raw edges, topstitching both sides for durability.
Piping adds striking definition. I insert covered cord between seam layers before assembly, using my zipper foot for close stitching. Contrast piping makes the silhouette pop dramatically.
Decorative stitching offers endless possibilities. I’ve used blanket stitch to couch ribbon along edges, creating texture and color highlights. Metallic threads with zigzag patterns stabilize seams while adding sparkle. Experimenting with stitch length and needle types helps you discover unique finishes that match your personal style.
My favorite approach? Combining techniques. I’ve layered bias tape with decorative stitching, and paired piping with lace overlays. These mixed-media edges create intricate, personalized designs that elevate any hoodie.
Install Ventilation Grommets or Mesh Inserts for Breathable Performance Hoods

When I first tackled a performance hoodie for my nephew’s soccer league, I didn’t realize how suffocating a fully lined hood could become during intense activity. Adding ventilation grommets transformed it completely. I marked placement points near the hood’s crown, punched small openings with sharp scissors, then secured brass grommets using a hammer and setter tool. The key? Reinforce those spots with interfacing first to prevent tearing.
For my own running jacket, I installed mesh inserts instead. I cut precise openings, positioned polyester mesh panels inside, and secured them with tight zigzag stitching to prevent fraying. The breathability improvement was remarkable—no more moisture buildup or overheating. If you don’t have grommet supplies on hand, buttonholes can be used as an alternative for drawstring openings and provide a clean, finished look.
Choose rust-resistant metal grommets for outdoor gear, and always test your punch size before committing to your final fabric.
Conclusion
I’ve spent years perfecting these techniques, and I’m thrilled you’re diving into hood construction! Start with a simple two-piece pattern—I still remember my first wonky attempt—then gradually add features like grommets or hidden channels. Don’t worry if your first try isn’t perfect; mine certainly wasn’t! Pick one technique that excites you most, grab your fabric, and start experimenting. You’ll be amazed at what you can create with practice and patience.

Keep reading
20 Latest Crochet Neck Warmer Ideas To Try In 2025!
Link up with the 20 best crochet neck warmers that blend warmth and style—discover which designs will transform your winter wardrobe!
20 Amazing Crochet Jewelry Ideas
Amazing crochet jewelry ideas await you, featuring unique designs that will inspire your creativity and elevate your accessory game to new heights.

20 Amazing Crochet Kit Ideas
Navigate through 20 amazing crochet kit ideas that spark creativity and joy; discover the perfect project to ignite your crafting passion!
Need personal guidance?
Talk to an advisor
Our care experts are here to help you make the right choice — for free.