15 Best Dirndl Sewing Ideas You Need To Try!
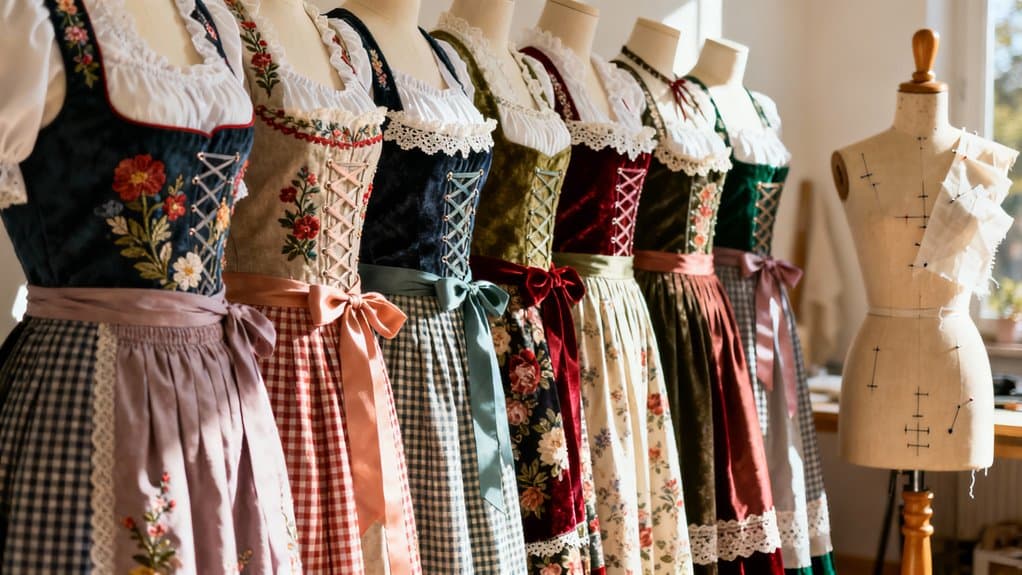
I’ve been sewing dirndls for years, and I can tell you there’s nothing quite like creating your own traditional Bavarian dress from scratch. Whether you’re drawn to the classic Tegernseer style with its buttoned bodice or prefer a modern mini-length version for Oktoberfest, each project teaches you something new about construction and fit. I’ve gathered fifteen designs that range from beginner-friendly to advanced—and I’m confident you’ll find at least three that match your skill level and personal style.
Key Takeaways
- Classic Tegernseer dirndl features buttoned bodice, back peplum, and hand-embroidered Edelweiss motifs for authentic Bavarian character and traditional appeal.
- Mini-length dirndl offers modern festival style with princess seams, lightweight fabrics, and distinctive piping for contemporary casual wear.
- Modular separates system allows mixing interchangeable bodices, skirts, and aprons for versatile wardrobe styling and personalized combinations.
- Plus-size dirndl incorporates adjusted shoulder seams and bust gussets using patterns like Burda 6268 for improved fit and comfort.
- Honeycomb smocking technique on aprons creates textured elasticity through dot-grid marking, running stitches, and zigzag backstitching formations.
Classic Tegernseer Dirndl With Buttoned Bodice and Back Peplum

When I first discovered the Tegernseer dirndl, I was struck by how its buttoned bodice and distinctive back peplum set it apart from other Bavarian styles. This authentic Alpine design originated as workwear around Lake Tegernsee and maintains its conservative charm through careful construction details. Additionally, the traditional silhouette of the dirndl contributes to its timeless appeal.
I love sewing the fitted bodice with decorative horn or metal buttons running down the front—it’s more challenging than using zippers but creates that genuine traditional look. The back peplum requires precise tailoring to achieve its subtle flared accent at the bodice’s base.
For fabrics, I recommend cotton or linen in classic blue, black, or green plaid. Pair your bodice with a full, calf-length gathered skirt and complementary apron. The skirt should feature deep pleats at the waist to achieve the traditional dirndl silhouette and allow for comfortable movement. Add hand-embroidered Edelweiss motifs for authentic regional character that honors Bavarian heritage.
Mini-Length Dirndl With Princess Seams for Modern Events

The mini-length dirndl represents a bold departure from tradition, and I’ve found it’s the perfect project when you want authentic Bavarian style with a contemporary edge. Princess seams are essential here—they run from armhole to hem, contouring your bust and waist without darts for a sleek, modern fit. I’ll carefully notch and pin those curved seam lines before stitching, then press them flat for a professional finish.
I choose lightweight cotton or linen for breathability, often adding moderate stretch for comfort. For closures, I prefer invisible zippers or decorative buttons. The shortened hemline works beautifully for festivals and summer gatherings, especially when I incorporate bold prints or contrasting piping along the seams. Piping serves as a signature detail of dirndls, created by cutting a bias strip, inserting cotton cord, and folding before attaching it along the princess seams. It’s youthful, playful, and surprisingly versatile. Incorporating creative embellishments can elevate your design even further, allowing for a truly unique piece that stands out.
Traditional Full-Length Dirndl With Homemade Piping Details

Crafting a full-length dirndl with homemade piping is one of my favorite sewing challenges—it’s where authentic Bavarian tradition meets meticulous craftsmanship. I start by taking precise bust, waist, and hip measurements, then adapt the bodice pattern with carefully placed darts for that signature contoured fit. The ankle-length skirt gets calculated pleats—I typically divide my waist measurement among seven pleats for elegant fullness. A great fabric choice for this project is cotton lawn, which provides comfort and breathability.
What truly elevates this project is the piping. I make mine from bias-cut strips encasing cording, then attach it during seam construction along the neckline, armholes, and front closure. Deep reds or hunter greens reinforce traditional aesthetics beautifully. I stabilize the bodice with interfacing, finish with a 4–6 cm hem for proper weight, and complete the look with a complementary apron. Since the dirndl consists of four separate pieces—blouse, bodice, skirt, and apron—I measure and construct each component individually to ensure the most flattering fit.
Separate Dirndl Blouse With Puffed Sleeves and Lace Edging

A separate dirndl blouse with puffed sleeves ranks among my most rewarding projects—it’s versatile enough to pair with multiple skirts and aprons while showcasing delicate construction techniques. I create the puff by slashing and spreading a basic sleeve block, spacing segments about 1.75 inches apart for moderate fullness. For a romantic silhouette, I extend up to 8 cm at the sleeve cap. I gather the sleeve hem with elastic tunnels or cuff bands to maintain shape. Lace edging adds traditional charm—I secure it with Vliesofix before zig-zag stitching along necklines and sleeve hems. Practical sewing tips—such as pattern layout and topstitching—enhance the overall design and usability of the blouse. Lightweight cotton works best, and I always reinforce edges with batiste under delicate lace. Adjusting cuff tightness lets me control how dramatically the puff stands out. I use machine embroidery thread for all decorative stitching to achieve clean, professional edges on my appliqués and lace attachments.
Embellished Apron With Smocking and Regional Embroidery

While puffed sleeves draw the eye upward, I’ve found that embellishing the apron creates an equally striking focal point that showcases traditional craftsmanship. I recommend honeycomb smocking for the apron front—it adds both texture and elasticity. You’ll achieve gathered smocking by stitching multiple rows and pulling threads for even pleating. Additionally, incorporating functional pockets can enhance the practicality of your design.
For embroidery, I prefer Bavarian techniques like cross-stitch and satin stitch. Regional motifs such as edelweiss, hearts, and flowers reflect your chosen tradition. Upper Bavarian styles feature dense floral designs, while Franconian patterns lean geometric.
I suggest using cotton or linen, cutting your apron 90–150 cm wide and ending 2–3 cm above the skirt hem. A pleater device simplifies alignment, and I finish with moire bands or lace edging for authentic detail. The apron fabric should be lighter than the dirndl so it drapes gracefully without weighing down the skirt.
Oktoberfest-Style Dirndl With Velvet Trim and Folklore Motifs

When I design an Oktoberfest-style dirndl, I start by selecting a rich base fabric—usually a medium-weight cotton or linen blend—in classic Bavarian blue, deep green, or burgundy. I draft a fitted bodice with a lace-up or zippered closure, then attach velvet trim along the neckline and bodice seams for textured contrast. The trim adds immediate luxury without overwhelming the silhouette. Additionally, I often consider fabric recommendations that suit different styles and body shapes to ensure a flattering fit.
For the gathered skirt, I maintain mid-calf length—the most traditional proportion for festivals. I incorporate folklore motifs like edelweiss or alpine roses using machine embroidery positioned vertically along bodice seams or horizontally at the hemline. The apron gets a velvet border that echoes the bodice treatment, creating visual cohesion. I line heavier sections carefully to prevent bulk, and I always recommend hand-washing or dry-cleaning to preserve the velvet’s integrity. The dirndl design honors long-standing traditions that originated in Alpine regions during the 19th century.
Modular Dirndl Separates for Versatile Wardrobe Styling

I’ve transformed my dirndl-making approach by building a modular wardrobe system instead of creating one-piece garments. I now sew separate bodices, skirts, blouses, and aprons that interchange seamlessly. Patterns like Burda 7870 offer two-piece designs perfect for mixing classic button-up bodices with mini, midi, or maxi skirts. I customize bodice fit with princess seams and adjustable lacing, then add contrasting piping for visual interest. This approach mirrors the way creative placemat sewing ideas allow for personalization and adaptability in crafting.
My blouse collection ranges from puff sleeves to off-shoulder styles, accommodating different seasons and occasions. I’ve created multiple aprons in varying fabrics—heavy brocade for winter festivals, lightweight linen for summer events. Some are reversible, doubling my styling options instantly.
This modular system simplifies laundering and repairs while expanding my outfit combinations exponentially. Strategic color-blocking across separates keeps my wardrobe cohesive yet versatile. I source most of my fabrics from stores in Germany, Joanns, and Amazon to maintain authenticity while keeping costs reasonable.
Plus-Size Dirndl With Adjusted Shoulder Seams and Bust Gussets

Creating a plus-size dirndl that truly fits requires two critical pattern modifications: adjusted shoulder seams and bust gussets. I’ve found that sloping the shoulder seam accommodates forward posture while preventing bodice slippage—essential for comfort. For broader shoulders, I widen the seam placement slightly to eliminate armhole gaping.
Bust gussets are game-changers. Patterns like Burda 6268 and 7443 include these shaped inserts, which distribute fullness across multiple seams rather than straining a single dart. I position gussets at the side or under-bust, blending them into princess seams for smooth shaping. Choosing the right sturdy fabrics can enhance the overall look and feel of your dirndl.
Before cutting your final fabric, make a muslin mock-up. Mark balance lines to assess posture and bust projection, then pin gussets in place for real-time adjustments. Use sturdy fabrics—embroidered silk or linen—and reinforce with interfacing at shoulders and bust for lasting structure. Sewing a dirndl is a rewarding creative project that allows you to personalize every design element.
Children’s Dirndl Ensemble With Gored Skirt and Simple Bodice

Since children need comfortable, durable garments that allow free movement, a dirndl ensemble built on a gored skirt and simple bodice delivers both authentic style and practical function. I recommend starting with 4–6 gores for gentle flare without waist bulk. For the bodice, I use wide shoulder straps (3–6 cm) and convert bust darts into soft gathers at center front—much more suitable for active kids.
I choose washable fabrics like cotton broadcloth or lightweight taffeta, always lining the bodice for structure and comfort. Patterns from McCall’s (M5795) or Burda (Kids 9509) offer excellent sizing ranges and sleeve options. I place zippers in the center back for easy dressing and finish seams with overlocking. When drafting from scratch, I begin with the basic Dirndl block as a template and work from key measurements including scye depth plus ease, back waist length, and hip depth. Adding a decorative apron and ribbon sash completes the traditional look.
Elegant Evening Dirndl in Silk With Satin Borders

While children’s dirndls prioritize playful durability, an evening dirndl in silk transforms the traditional garment into true formalwear. I recommend structured silks like taffeta, shantung, or dupioni—they hold the bodice shape beautifully while providing that luxurious sheen you’re after.
The construction demands precision. I sculpt the bodice with princess seams and carefully placed darts, then lower the neckline for an elegant evening look. For drama, I use wide silk panels—often two meters each—to create full, gathered skirts.
Here’s where satin borders make all the difference: I topstitch them along necklines, hems, and apron edges for striking visual contrast. Choose jewel tones like emerald or sapphire, and finish all seams meticulously with French seams to prevent fraying. Consider adding velvet or organza trimmings alongside the satin for authentic traditional detailing. Use fine needles and quality thread throughout.
Jumper-Style Dirndl Dress for Contemporary Casual Wear

The jumper-style dirndl strips away the formality and brings this traditional garment into everyday life. I’ve found the sleeveless bodice design perfect for layering over t-shirts or casual blouses, making it incredibly versatile. The wide straps and higher neckline modernize the silhouette while maintaining that classic dirndl charm.
I recommend using Burda pattern BUR6268 for reliable construction. Choose lightweight cotton, linen, or denim for breathability and easy care. The button or zipper front closure simplifies daily wear, and pleated or gathered skirts accommodate various fabric weights comfortably.
I prefer shorter aprons—about 2–4 inches above the hem—with intentional mismatched fabrics for visual interest. Skirt pattern pieces can be easily modified if you want to adjust the length or fullness to suit your personal style. Pair with sneakers or boots for mobility. This style excels at family gatherings and urban settings where practicality matters most.
Dirndl With Relocated Side Seams for Enhanced Waist Shaping

Moving the side seams toward the back transforms a dirndl from a traditional boxy shape into a garment with genuine waist definition. I relocate the seam about 2 cm toward the back, tracing the back pattern up to this new position and overlaying it onto the front. This shift lets me incorporate the back waist darts—typically 3.5 cm of intake—directly into the princess seam line for a beautifully tapered silhouette.
I lower the armhole by 2–3 cm and trim 1.5 cm from the shoulder seam at the armhole to maintain balance. Before finalizing these relocated seams, I baste them first to confirm the fit works with my specific measurements. The result? A sleek, refined fit that visually narrows the front panel and eliminates boxiness. You’ll need to clip curved seam allowances and press carefully to prevent puckering, but the sophisticated, custom-tailored look is worth every step.
Traditional Dirndl With Elaborate Button Closures and Ribbons

When I’m building a truly traditional dirndl, I treat buttons and ribbons as more than functional elements—they’re the storytelling details that anchor the garment in centuries of Alpine heritage. I carefully mark buttonhole placement with tailor’s chalk, spacing each one evenly along the bodice placket for balanced symmetry. Metal or decorative filigree buttons become focal points, especially when paired with contrasting ribbon trims that line seams and edges.
For the apron, I select wide grosgrain or satin ribbons—typically 2–3 inches—ensuring they’re strong enough for repeated tying. I finish the ends diagonally for durability and style. When adding embellishment, I layer embroidered ribbon borders at necklines and hems, sometimes weaving colored cords through eyelets. Interfacing the button placket prevents distortion, preserving the dirndl’s structured, heritage-rich appearance. I position elastic at hem below bust to ensure the blouse sits properly beneath the bodice, creating the authentic gathered silhouette that defines traditional dirndl construction.
Honeycomb Smocked Dirndl Apron With Custom Trim

Honeycomb smocking transforms a simple dirndl apron into an heirloom piece that balances texture, tradition, and wearability. I mark a dot grid on linen or cotton fabric at 1/2″ intervals, then use running stitches to gather rows into pleats. The honeycomb pattern emerges as I backstitch adjacent pleats in zigzag formation, creating dimensional diamonds across the apron front.
I test my grid spacing on sample fabric first, using water-erasable markers to avoid permanent marks. Starching before smocking gives me crisp, lasting pleats. I begin by gathering a few millimeters of fabric at each dot before securing the fold with several stitches. For finishing touches, I withdraw 8–10 horizontal threads 1.75″ above the hem to create drawn-work borders, securing them with double hemstitch. Custom trim along the top edge or monogrammed details personalize the piece while respecting traditional aesthetics.
Wedding-Ready Dirndl With Lowered Neckline and Organza Details

Because a wedding dirndl demands both romance and structural integrity, I start by drafting a bodice with a lowered neckline—typically an 8 cm drop at center front—that flatters the décolletage while maintaining support through princess seams and internal boning. I’ll choose luxurious fabrics like silk or satin for the bodice, then layer sheer organza overlays on the apron for an ethereal effect. The neckline shape—whether straight, Munich, or soft-square—sets the formality level, so I always perform a mock-up fitting first to guarantee proper bust support and drape. I finish visible edges with bias-bound or piped organza trim, then add embellishments like pearl buttons or embroidered appliqués. For length, I prefer floor or maxi cuts that enhance the bridal silhouette, pairing everything with a coordinating organza apron and delicate puffed sleeves. When working with gussets, I sew bodice seams first before attaching them to achieve cleaner, more professional-looking intersections.
Conclusion
I’ve shared these fifteen dirndl projects because they’ve genuinely transformed how I approach traditional sewing. Whether you’re drawn to the classic Tegernseer style or want to experiment with modern mini-lengths, each pattern offers unique construction challenges that’ll sharpen your skills. I’m particularly excited about the smocking techniques and waist-shaping modifications—they’re game-changers for achieving that perfect fit. Pick your favorite design, gather your fabrics, and let’s keep this beautiful Bavarian tradition alive through our needlework!

Keep reading
20 Latest Crochet Neck Warmer Ideas To Try In 2025!
Link up with the 20 best crochet neck warmers that blend warmth and style—discover which designs will transform your winter wardrobe!
20 Amazing Crochet Jewelry Ideas
Amazing crochet jewelry ideas await you, featuring unique designs that will inspire your creativity and elevate your accessory game to new heights.
20 Amazing Crochet Kit Ideas
Navigate through 20 amazing crochet kit ideas that spark creativity and joy; discover the perfect project to ignite your crafting passion!
Need personal guidance?
Talk to an advisor
Our care experts are here to help you make the right choice — for free.