22 Amazing Crochet Christmas Gnome You Will Love!
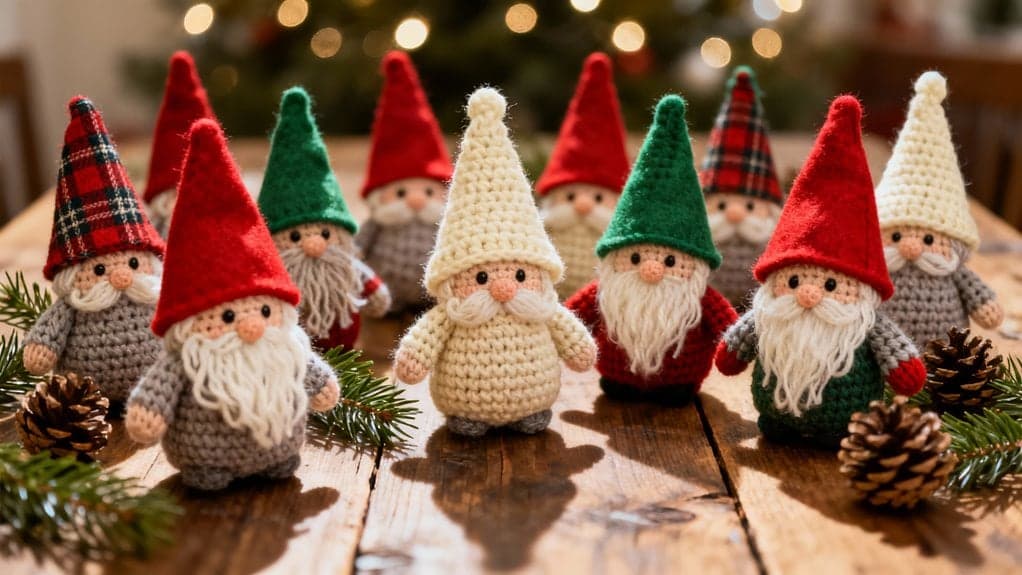
I've been crocheting Christmas gnomes for years, and I can't wait to share these 22 patterns with you! Whether you're drawn to traditional Scandinavian tomtes or playful mini ornaments, there's something here for every skill level. I've tested each design myself, and I'm excited to walk you through the techniques that'll transform simple yarn into adorable holiday magic. Let me show you why these bearded little friends will become your new seasonal obsession.
Key Takeaways
- Scandinavian Tomte gnomes feature long beards, pointed hats, and wooden bead noses using worsted weight yarn in traditional Nordic colors.
- Mini gnome ornaments measure 2-3 inches, taking under 30 minutes to create with fingering weight yarn for quick gift-giving.
- Striped hat gnomes add personality through alternating colors like red and white, standing approximately eight inches tall for display.
- Light-up gnomes incorporate LED tea lights with lighter yarn colors, creating magical ambiance for mantels and windowsills.
- Nordic gnome family sets include papa, mama, and baby gnomes in coordinating colors, ideal as handmade holiday gifts.
Classic Scandinavian Tomte Gnome Pattern

The traditional Tomte gnome captures everything magical about Scandinavian Christmas folklore—a long flowing beard, a distinctive pointed hat, and that timeless, mysterious charm that's been warming Nordic homes for generations. I'll guide you through creating this beloved character with worsted weight yarn in classic gray or red for the body, plus white for that signature flowing beard. You'll start with the cone-shaped hat, working in continuous rounds to build the body. The beard requires special attention—I recommend using a loop stitch or cutting yarn strands for authentic texture. Don't skip the wooden bead nose; it's essential for capturing that traditional Tomte expression. Crochet Christmas decorations are a perfect way to enhance the festive spirit this holiday season. Position your gnome on a mantel or nestled among evergreen branches where his watchful presence can protect your home throughout the season. Look for this item on Amazon
Mini Gnome Ornament Collection
Tiny ornaments pack maximum charm when you're decorating a tree with handmade treasures, and these mini gnomes deliver all the Scandinavian magic in a perfectly pocket-sized package. I'm obsessed with how these 2-3 inch beauties transform any Christmas tree into a whimsical wonderland.
You'll work with fingering weight yarn and a 2.25mm hook to achieve that delicate scale. The construction simplifies beautifully at this size—basic cone shapes for bodies, tiny wooden beads for noses, and wispy yarn strands for beards. I recommend creating sets of five or seven in coordinating colors: traditional reds and whites, or try soft pastels for a modern Scandinavian aesthetic. Additionally, consider pairing these gnomes with cozy home decor elements to enhance your holiday decorations.
These miniatures work up in under 30 minutes each, making them perfect for gift-giving. Attach jump rings to the tops, and you've got charming tree ornaments that friends will treasure for years. Look for this item on Amazon
Bearded Gnome With Striped Hat
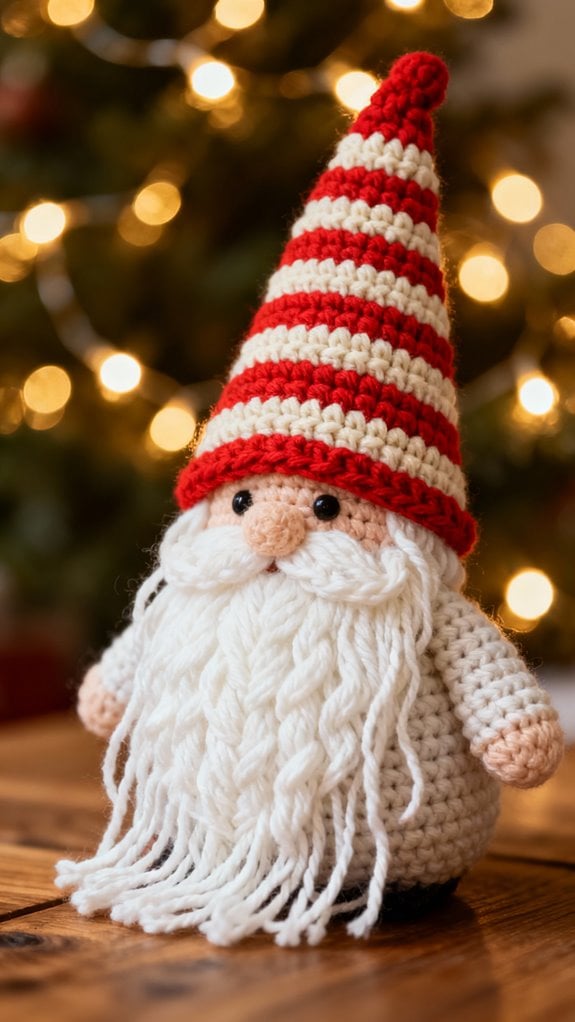
Stripes add instant personality to any gnome design, and this classic bearded fellow showcases exactly how transformative simple color changes can be. I'm genuinely excited about this pattern because it teaches you striping techniques while creating a charming decoration.
The alternating colors on his hat create visual interest that draws the eye upward, while his flowing beard provides wonderful textural contrast. You'll work in the round for the hat, switching colors every few rows to achieve those crisp stripes.
I recommend choosing traditional Christmas colors like red and white, or experimenting with unexpected combinations like teal and gold. The beard uses a loop stitch technique that creates realistic-looking whiskers. This gnome stands approximately eight inches tall, making him perfect for mantels or tabletop displays. Adding unique accessories to gnomes can further enhance their charm and personal touch. Look for this item on Amazon
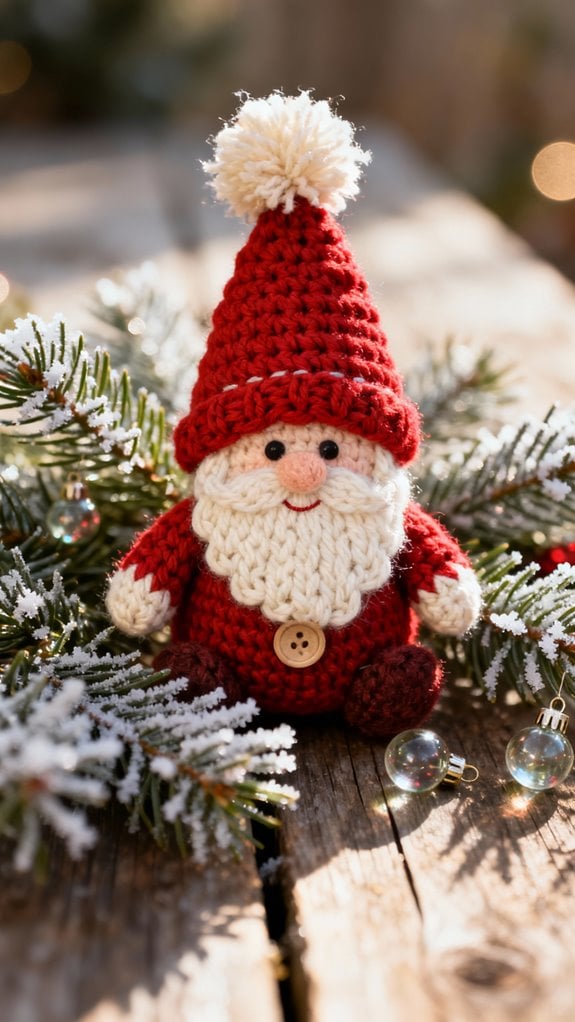
Amigurumi Santa Gnome

Combining amigurumi techniques with Santa-inspired details transforms this gnome into something truly magical for your holiday collection. I love how this pattern incorporates Santa's iconic red suit and white fur trim through strategic color changes and textured stitches.
You'll work in continuous rounds to create a seamless body, then add distinctive Santa elements like a belt buckle using embroidery or felt appliqué. The beard flows naturally from beneath the hat, and I recommend using fluffy white yarn for authentic texture.
What makes this gnome special is the attention to tiny details—golden buckle, rosy cheeks, and a pompom-tipped hat. You can customize the size easily by adjusting your hook and yarn weight. This design works perfectly as a tree ornament or mantle decoration that'll become a cherished holiday tradition. Look for this item on Amazon
Nordic Christmas Gnome Family Set

Creating a complete gnome family brings the Scandinavian tradition of "tomte" figures to life in your holiday décor. I'll show you how to craft matching gnomes in graduating sizes that'll transform your mantel or tabletop display.
Start with a papa gnome at 12 inches, mama at 10 inches, and baby gnomes at 6 inches. Use coordinating yarn colors—traditional reds, grays, and whites work beautifully together. I recommend creating consistent facial features across the family by using the same beard yarn and nose size ratios.
You can personalize each gnome with unique hat patterns: stripes for papa, a braided edge for mama, and pom-poms for the little ones. This set makes an incredible handmade gift that families will treasure for generations of holiday seasons. Look for this item on Amazon
Gonk-Style Gnome With Fuzzy Beard

The fuzzy-bearded gonk brings a delightfully whimsical twist to traditional Christmas gnomes with its ultra-shaggy appearance and rounded silhouette. I'm absolutely thrilled by how this style transforms simple yarn into something truly magical!
You'll create this charming character using loop stitch or furry yarn to achieve that signature fluffy beard. The key is building a spherical base body, then adding an oversized conical hat that drapes adorably to one side. I recommend using bulky weight yarn for quick progress and maximum fluffiness.
What makes this gonk special is its personality – those tiny details matter! Position wooden bead eyes just beneath the hat brim, and watch your gnome come alive. The beard should dominate, creating that wonderfully shaggy, almost sheepdog-like appearance that's become so popular in Scandinavian Christmas décor. Look for this item on Amazon
Sitting Gnome With Dangly Legs
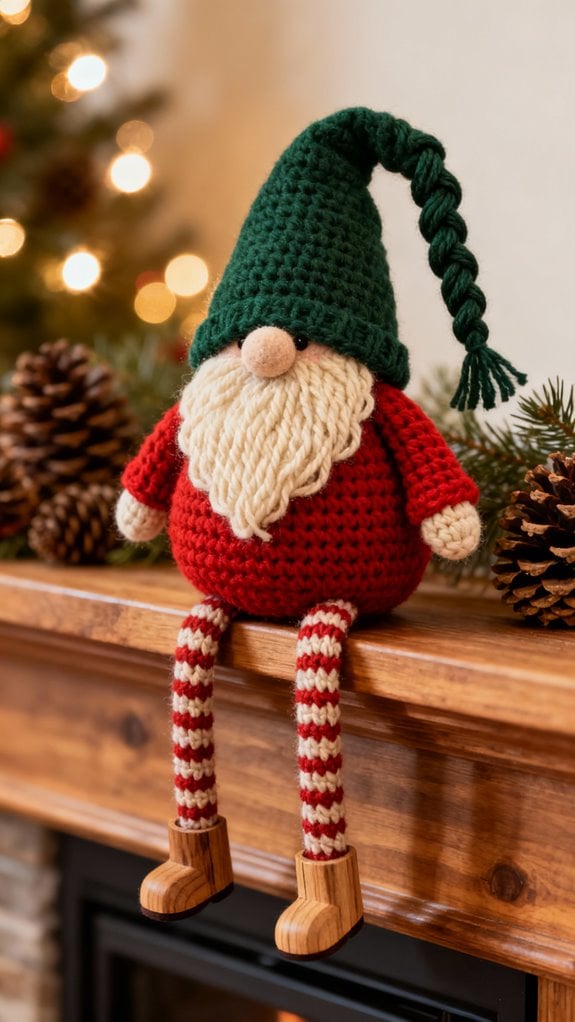
Adorable dangling legs instantly transform an ordinary crochet gnome into an irresistibly charming shelf-sitter! I love how these whimsical designs perch perfectly on mantels, shelves, and table edges, adding dimensional appeal to your holiday décor.
You'll create stuffed legs using simple decrease rounds, then attach them loosely at the hip area so they swing freely. The key is positioning—place your gnome where those legs can dangle unobstructed. I recommend using weighted beads or poly pellets in the body to prevent tipping.
Striped stockings make particularly festive legs! Alternate red and white rounds, or try traditional Christmas colors. Add tiny crocheted boots or felt shoe embellishments to complete the look. These sitting gnomes work beautifully in graduated sizes, creating an enchanting family display that'll captivate everyone who visits your home. Look for this item on Amazon
Gnome Couple in Matching Outfits

Matching gnome couples bring twice the charm to your Christmas decorating scheme! I absolutely love displaying coordinating pairs on mantels or flanking doorways. You'll create these adorable duos by crafting identical beards, hats, and body shapes while varying their sizes slightly—making one gnome about two inches taller adds visual interest.
I recommend choosing complementary colors like red and white or green and cream for their outfits. You can differentiate the gnomes by adding a beard to one and rosy cheeks to the other, or give them matching scarves in opposite color combinations.
These couples work beautifully as wedding toppers, anniversary gifts, or holiday centerpieces. I've found that stitching them holding hands or positioning them close together creates an endearing scene that visitors can't help but admire throughout the season. Look for this item on Amazon
Rustic Farmhouse Gnome Design
While coordinating pairs offer timeless appeal, rustic farmhouse gnomes bring a cozy, down-home aesthetic that's perfect for country-style holiday decor. I love incorporating natural textures like jute beards and burlap hats to achieve that authentic farmhouse feel.
You'll want to choose earthy color palettes—think cream, sage green, barn red, and weathered gray. These muted tones complement wood accents and galvanized metal beautifully. I recommend adding plaid fabric details or buffalo check patterns to the gnome's clothing for that classic farmhouse touch.
Don't forget the finishing details! Wooden bead noses, twine accents, and miniature burlap sacks create dimension. You can even attach small pine sprigs or cotton stems for extra rustic charm. These gnomes look stunning displayed on wooden crates or alongside vintage lanterns, creating that inviting farmhouse Christmas atmosphere everyone adores. Look for this item on Amazon
Colorful Rainbow Gnome Pattern

Bursting with vibrant energy, rainbow gnomes transform traditional holiday decor into a joyful celebration of color that kids and adults alike can't resist. I'm thrilled to share this pattern that uses Red Heart Super Saver yarn in seven bright shades.
You'll create graduated stripes across the gnome's body, starting with red at the base and evolving through orange, yellow, green, blue, indigo, and violet. The beard remains classic white, making those rainbow colors pop even more dramatically.
I recommend working in single crochet stitches for crisp color definition. Change yarns every three rows to achieve perfectly proportioned stripes. This design works beautifully as a standalone piece or grouped with traditional gnomes for stunning contrast that energizes your entire holiday display. Look for this item on Amazon
Snowflake Gnome With Winter Details

For crafters who love elegant winter themes, this snowflake gnome captures the magic of a fresh snowfall with its frosty embellishments and icy color palette. I'm absolutely delighted by how the designer incorporated delicate snowflake appliqués across the beard and hat, creating stunning dimensional texture. You'll work with whites, silvers, and pale blues that shimmer like ice crystals.
The pattern includes instructions for crafting miniature snowflakes using thread weight yarn, which you'll attach strategically for maximum impact. I particularly love the silver-trimmed hat edge and the tiny pearl beads scattered throughout. The construction requires intermediate skills, especially when attaching those delicate snowflakes without flattening them.
This gnome makes an exquisite mantel decoration or thoughtful gift for anyone who appreciates winter's serene beauty. You'll feel proud displaying this frosty masterpiece. Look for this item on Amazon
Beginner-Friendly Simple Gnome

If you're just starting your crochet journey, this streamlined gnome pattern is exactly what you need to build your confidence while creating something adorable.
This design strips away complicated stitches and focuses on basic single crochet techniques. You'll work with simple shapes—a cone hat, round body, and attached beard—that come together beautifully without overwhelming you with instructions.
I love how forgiving this pattern is. Minor tension variations won't ruin your finished gnome, and you can complete it in an evening. The minimal color changes mean fewer ends to weave in, which keeps frustration low.
Choose medium-weight yarn in classic red and white for a traditional look. The straightforward construction teaches you essential skills like increasing, decreasing, and basic shaping. You'll finish with a charming decoration and newfound crochet confidence. Look for this item on Amazon
Large Shelf-Sitter Gnome

Standing 12-15 inches tall, this substantial gnome commands attention on mantels, bookshelves, and entryway tables. I love how this larger scale lets you showcase textured stitches and intricate details that smaller projects simply can't accommodate.
You'll use bulky or super bulky yarn, which means this impressive piece works up faster than you'd expect. The weighted base keeps him stable and prevents tipping—essential for a gnome this size. I recommend adding wire armature inside the hat so you can pose it exactly how you want.
The larger format gives you room to experiment with embellishments like wooden beads for the nose, faux fur for the beard, or even battery-operated fairy lights tucked inside. This gnome becomes a true statement piece that guests will admire throughout the holiday season. Look for this item on Amazon
Gnome With Interchangeable Hats

While most gnomes wear a single festive hat, this clever design features a detachable top that transforms one gnome into an entire holiday collection. I'm thrilled to share this space-saving pattern that lets you create multiple looks without crocheting separate gnomes.
The magic lies in the construction. You'll work the base gnome with a sturdy body and beard, then craft interchangeable hats that attach securely with buttons or snaps. I recommend starting with classic Christmas colors—red, green, and white—then expanding to themed variations like snowflakes, reindeer, or candy canes.
This design maximizes your creative investment. You'll spend time perfecting one beautiful gnome body, then quickly whip up seasonal hats throughout the year. It's perfect for gift-giving too, since recipients can switch styles to match their décor. Look for this item on Amazon
Tiered Tray Gnome Trio

Tiered trays have become the ultimate farmhouse display piece, and these mini Christmas gnomes are sized perfectly to fill each level with festive charm. I'm obsessed with how the trio coordinates without being matchy-matchy—each gnome features unique colors and patterns while maintaining cohesive holiday vibes.
You'll work these cuties in worsted weight yarn, keeping each gnome between 4-5 inches tall. The compact size means you'll finish one in just an evening! I recommend making the beards slightly fuller than standard gnomes since they're focal points at this scale.
Position them strategically: place the tallest on the top tier, creating visual flow downward. Mix in bottle brush trees, LED tea lights, or cinnamon sticks between them. The smaller scale lets you experiment with bold color combinations you might hesitate using on larger projects. Look for this item on Amazon
Plaid Hat Gnome Pattern
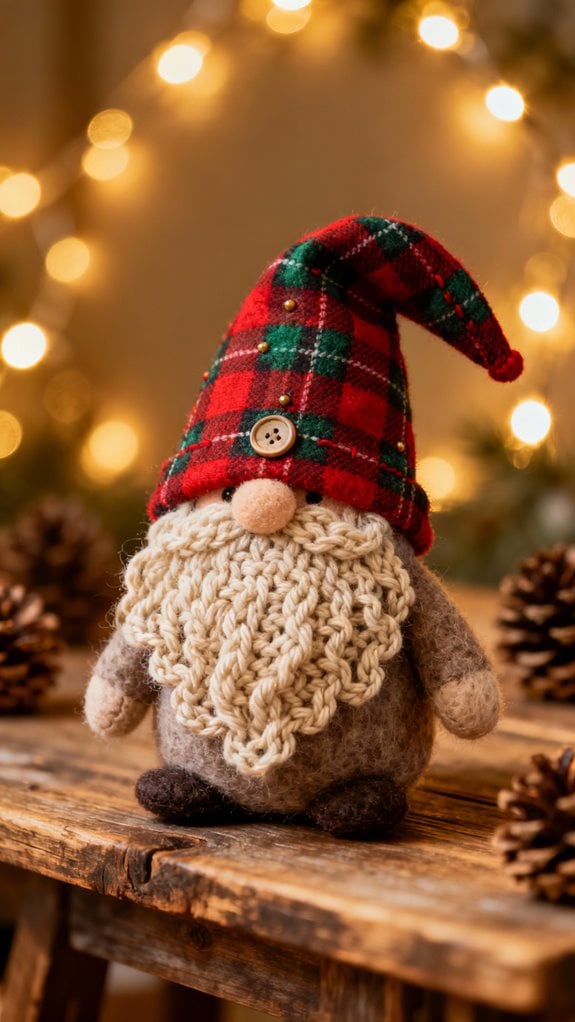
Plaid patterns transform an ordinary gnome into something that screams cozy cabin Christmas, and I've cracked the code for achieving that classic look without weaving in a million yarn ends. The secret? Surface crochet creates those signature plaid lines directly onto your finished hat. I work horizontal stripes first, then add vertical slip stitches overtop to build that crosshatch effect.
Choose two contrasting colors against your base shade—think deep red and forest green on cream, or navy and burgundy on gray. You'll maintain tension by holding your working yarn behind the fabric while pulling loops through to the front. The dimensional texture mimics real flannel beautifully. This technique works perfectly on cone-shaped hats, and you can customize stripe width to match your favorite holiday flannel shirt. Look for this item on Amazon
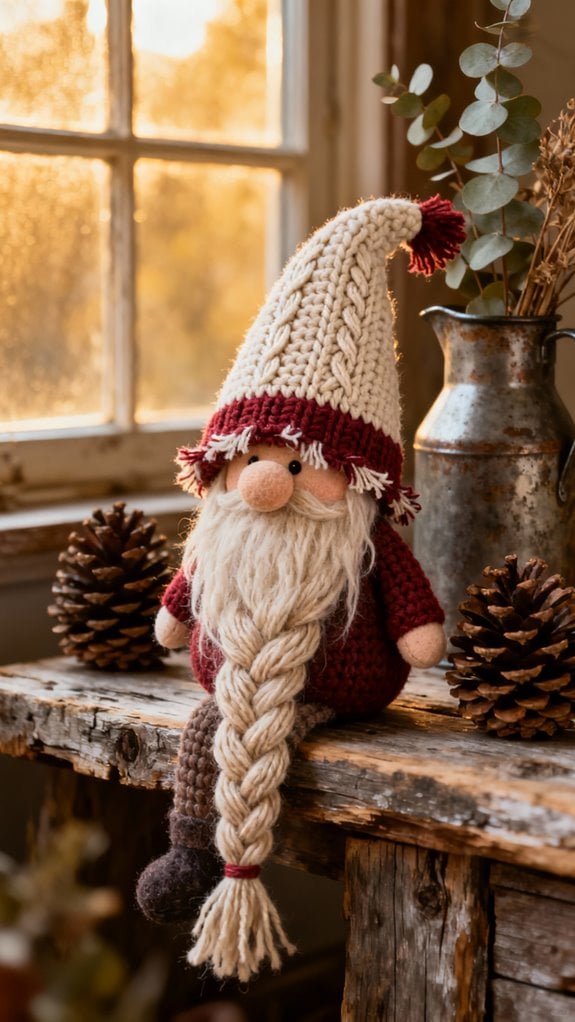
Girl Gnome With Braided Hair

Beyond decorative hat details, you can develop a gnome's personality through hair design, and braided styles instantly create that sweet girl gnome aesthetic. I love working with chunky yarn to create thick, rope-like braids that frame the gnome's face beautifully.
You'll typically attach yarn strands to the head area beneath the hat, then divide them into three sections for classic three-strand braids. I recommend securing the ends with tiny ribbon bows or crocheted flowers for extra charm. Experiment with different yarn textures—fuzzy yarn creates whimsical, wild braids while smooth cotton gives polished results.
The braid length is entirely your choice. Shorter braids suit sitting gnomes perfectly, while longer ones work wonderfully for standing displays. Add wooden beads threaded onto the braids for Scandinavian-inspired flair. Look for this item on Amazon
Wine Bottle Gnome Topper

Transforming wine bottles into festive décor pieces has become one of my favorite holiday traditions, and gnome toppers make this craft especially delightful. These charming toppers slip perfectly over standard wine bottles, creating instant centerpieces or hostess gifts that'll wow everyone.
I design mine with a hollow bottom that fits snugly around the bottle neck. The gnome's body drapes naturally down the bottle sides, while his signature pointy hat extends upward. You'll work in continuous rounds, adjusting your tension to create the proper fit.
I love adding textured beards using loop stitches and crafting extra-long hats that curl whimsically. These toppers work beautifully with both full and empty bottles, and they're reusable year after year. You can even customize colors to match your holiday décor scheme perfectly. Look for this item on Amazon
Light-Up Gnome With LED Nose

Adding a glowing nose takes your crochet gnome from adorable to absolutely magical. I'm thrilled to share this enchanting project that'll make your Christmas décor truly stand out.
You'll need a small LED tea light or battery-operated fairy light for the nose. I recommend creating a small pocket in your gnome's face using single crochet stitches, leaving an opening to insert the light. Work with lighter yarn colors like cream or tan so the glow shines through beautifully.
The key is securing the LED safely while keeping it accessible for battery changes. I attach a small flap with a button closure at the back. When you switch it on during evening gatherings, watching faces light up alongside your gnome is pure joy. It's perfect for mantels or windowsills. Look for this item on Amazon
Pocket-Sized Keychain Gnome

These tiny treasures pack all the charm of full-sized gnomes into a perfectly portable 2-3 inch design. I'll show you how to create adorable keychains that bring festive cheer wherever you go.
You'll work with sport or fingering weight yarn and a 2.25mm hook for these miniature marvels. Start with a simple magic ring for the body, then attach a felt beard and tiny pointed hat. I love adding a small keyring clasp to the top before stuffing.
The beauty here is speed—you'll finish one in under an hour! Try making them in traditional red and green, or experiment with metallic threads for extra sparkle. They're perfect stocking stuffers, gift bag decorations, or backpack accessories. Your friends will absolutely request their own custom colors once they see yours dangling from your keys. Look for this item on Amazon
Gnome Wreath Embellishment

When you're ready to elevate your holiday decor beyond store-bought basics, crocheting custom gnomes for your wreath creates an instant focal point that guests won't stop talking about. I've discovered that miniature gnomes (around 3-4 inches tall) work perfectly without overwhelming the wreath's greenery.
You'll want to attach them using floral wire threaded through the back of each gnome, securing it firmly to the wreath frame. I recommend creating a family of three gnomes in coordinating colors—perhaps traditional red, white, and gray. Position them asymmetrically for visual interest rather than spacing them evenly.
The beauty here is customization. Add tiny accessories like miniature gift boxes, candy canes, or pinecones that you've also wired onto your gnomes' hands. This transforms a simple wreath into a personalized masterpiece that reflects your creative vision. Look for this item on Amazon
No-Sew Beginner Gnome Alternative

Not everyone has mastered crochet skills yet—and that's perfectly fine! I've got a fantastic no-sew alternative that'll let you create adorable Christmas gnomes without picking up a hook.
You'll need a foam cone, faux fur fabric, felt, and hot glue. Simply wrap the cone with fabric for the body, attach a fur piece for the beard, and glue on a felt hat. That's it! The whole project takes about 20 minutes.
I love this method because it's incredibly forgiving. If something doesn't look right, you can easily reposition pieces before the glue sets. Plus, you can experiment with different textures and materials without worrying about tension or stitch count.
These no-sew gnomes look just as charming displayed alongside their crocheted cousins! Look for this item on Amazon
Conclusion

I can't wait for you to pick your favorite gnome from this collection and bring it to life! Whether you're crafting a classic Tomte for your mantel or stitching up tiny ornaments for everyone on your gift list, these patterns will fill your home with handmade magic. Grab your hook, choose some festive yarn, and let's create Christmas memories one adorable gnome at a time. Happy crocheting, my friend!
Keep reading

20 Latest Crochet Neck Warmer Ideas To Try In 2025!
Link up with the 20 best crochet neck warmers that blend warmth and style—discover which designs will transform your winter wardrobe!

20 Amazing Crochet Jewelry Ideas
Amazing crochet jewelry ideas await you, featuring unique designs that will inspire your creativity and elevate your accessory game to new heights.

20 Amazing Crochet Kit Ideas
Navigate through 20 amazing crochet kit ideas that spark creativity and joy; discover the perfect project to ignite your crafting passion!
Need personal guidance?
Talk to an advisor
Our care experts are here to help you make the right choice — for free.