15 Best Chaps Sewing Ideas You Need To Try!
I’ve been sewing chaps for years, and I’m excited to share my favorite designs with you. Whether you’re drawn to classic Western fringe, bold festival styles, or practical riding gear, there’s a pattern here that’ll match your vision. I’ll walk you through each technique, from selecting the right materials to adding those finishing touches that make your chaps truly stand out. Let me show you how to create something you’ll actually want to wear.
Key Takeaways
- Festival chaps using holographic materials, bold prints, or UV-reactive panels with modular patterns for customizable leg silhouettes and embellishments.
- Classic Western chaps handmade with full-grain tooling leather, decorative fringe, and oil-tanned leather for authentic durability and flexibility.
- Bell-bottom performance chaps constructed from 4-way stretch fabrics with exaggerated flares, ideal for mobility and stage presence.
- High-waisted garter strap chaps featuring adjustable buckles, color-blocked vinyl panels, and decorative hardware for personalized fit and style.
- Wooly riding chaps using angora hide or wool pelts with shotgun patterns and zippers for warmth, insulation, and winter functionality.
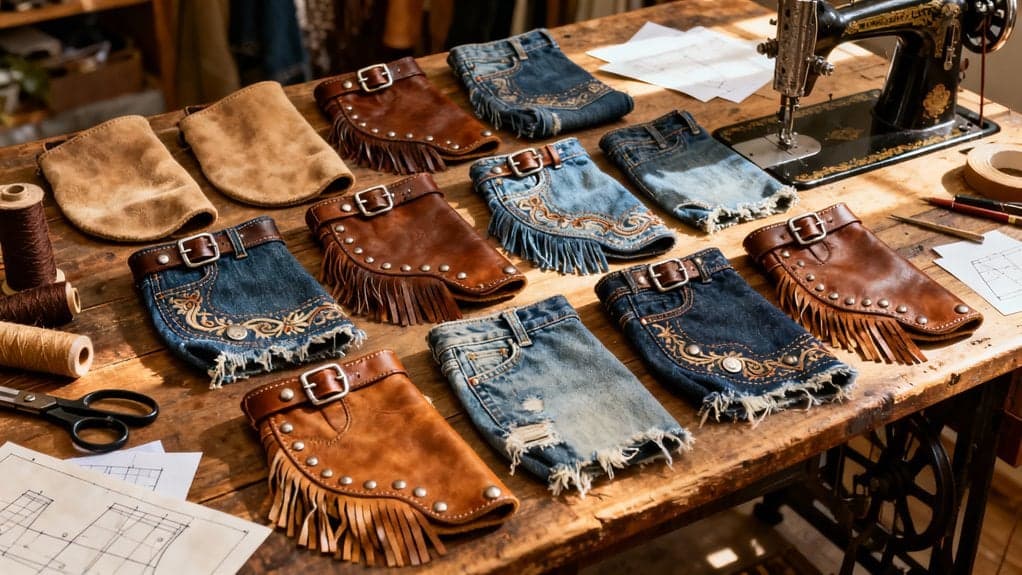
Classic Western Chaps With Yoke Detailing and Fringe

There’s something deeply satisfying about running your hands over a pair of handmade Western chaps, especially when you’ve tooled every detail of that yoke yourself. I always start by selecting full-grain leather—7/8 oz tooling leather works beautifully for the yoke. You’ll want to moisten the leather just right before tooling; too dry gives shallow impressions, too wet causes distortion. I use a granite surface and weighted mallet for consistent basket weave or floral patterns. When creating your design, consider referencing stylish patterns that can inspire your tooling ideas.
For fringe, I cut 1/4-inch strips from the outer leg panels, typically 3-8 inches long depending on your style. Here’s my trick: cut small wedges every few inches so the fringe drapes naturally without bunching. Oil-tanned leather works best here for flexibility and longevity. When tracing your pattern pieces onto the leather, an Osborne #5 overstitch wheel is invaluable for marking without accidentally cutting through.
Bell-Bottom Performance Chaps for Stage and Festival Wear

While traditional Western chaps celebrate heritage and craftsmanship, bell-bottom performance chaps throw all that restraint out the window in favor of pure, unapologetic drama. I’m talking about leg-lengthening flares that explode from knee to ankle, creating jaw-dropping motion whether you’re dancing, performing, or commanding a festival stage.
I always start with 4-way stretch fabrics like spandex or stretch faux leather—they’ll move with you through splits and high kicks without restricting your performance. The construction’s surprisingly straightforward: fitted thigh panels connect to exaggerated bell-flare pieces. I recommend mocking up your pattern first with cheap stretch fabric to nail the fit. Practical modifications such as adding pockets or adjustable features can enhance functionality for performers.
Here’s where customization gets exciting: add UV-reactive panels, sequins, mesh cutouts, or color-blocking along those flares. Adjustable garter straps or elastic waistbands accommodate padding beautifully while keeping everything secure during high-energy routines. These patterns often feature a longer rise to accommodate hip pads and create the enhanced silhouettes essential for stage performance.
High-Waisted Garter Strap Chaps With Adjustable Buckles

These adjustable buckle beauties solve one of the biggest frustrations I’ve encountered with performance chaps: getting the perfect fit without wrestling through multiple fittings. I’ll position garter straps over the front and back of my mid-thigh, wrapping them around the belt for customization that actually works.
The construction starts with finishing raw edges using ½-inch double-fold bias tape. I’ll mark fold lines lightly before sewing the bias tape right sides together along the seam allowance. For buckle attachment, I’ve got two options: completely secure them by sewing around the buckle, or fold and stitch with excess length for adjustment.
The high-waisted version features elastic covered with non-stretch fabric, giving me flexibility without sacrificing structure during performances. Additionally, incorporating decorative finishes can elevate the overall look and style of your chaps.
Color-Blocked Vinyl Chaps for Bold Visual Impact

When I want my stage presence to pack an undeniable punch, color-blocked vinyl chaps become my secret weapon for creating looks that stop scrollers mid-swipe and turn heads across crowded venues. I draft multi-panel patterns where each section represents a distinct color block, adding 1/4-inch seam allowances for precision fitting since vinyl barely stretches. I use sharp rotary cutters for crisp edges and painter’s tape when piecing panels together—this maintains those bold, graphic boundaries that make color blocking work. High-contrast pairings like electric blue against neon pink deliver maximum impact, while the vinyl’s glossy finish amplifies color separation beautifully. Creative sewing ideas can inspire your own unique designs. Before assembling, I prepare each vinyl panel’s surface with rubbing alcohol to remove any oils or residues that might interfere with adhesive bonding or top-stitching adhesion. I topstitch seams for durability and visual emphasis, then style my finished chaps over bodysuits or shorts for festival-ready drama.
Wooly Riding Chaps With Dense Lining for Cold Weather

Because temperatures plummet and winter winds cut through standard riding gear like it’s nothing, I turn to wooly riding chaps with dense lining as my go-to solution for staying warm in the saddle during brutal cold snaps. I start with a shotgun chap pattern, then glue and stitch angora hide or dense wool pelts directly to durable chap leather. The key is accounting for wool’s bulk during panel sizing—you’ll need extra room for mobility. Proper edge finishing is essential to ensure durability and a polished look. I always add zippers for easy wear over bulky winter clothing and reinforce all seams at stress points. What I love most is wool’s natural ability to insulate even when damp, wicking moisture while blocking wind chill. Before final assembly, I shear the hair under belt pieces to reduce bulk and create a cleaner finish where hardware attaches. With adjustable belts and proper edge finishing, these chaps eliminate extra layering without restricting movement.
Low-Rise Faux Leather Chaps With Side Stripe Accents

Low-rise faux leather chaps with side stripe accents deliver that perfect Y2K throwback aesthetic I’ve been craving for festival season and stage performances. I’ll start by selecting non-stretch faux leather to maintain structure, then decide whether I want bell bottom or straight leg styling. The side stripes become my design focal point—I can place them above or below the knee for different visual effects, using contrasting colors for bold impact. Incorporating functional details like snap closures can enhance both style and practicality.
For construction, I’ll use double-folded bias tape to finish seams cleanly and install inner leg zippers for easy wear. The waistband choice matters too—I prefer adjustable belts over elastic for better fit control. Adding optional buckles or studs elevates the look instantly. When paired with high heels, these chaps create amazing leg elongation that’s perfect for dramatic stage presence. The pattern includes 12 unique style combinations that allow me to customize the design for bold stage looks, festival outfits, or western costumes.
Modular Mix-And-Match Chaps With Interchangeable Leg Panels

Modular mix-and-match chaps have completely transformed how I approach my performance wardrobe by letting me swap out individual leg panels instead of owning multiple complete pairs. I attach panels using heavy-duty zippers or robust snap fasteners, which hold securely during movement while allowing quick changes between events. You’ll find this design incredibly practical when weather shifts or when one panel needs repair—just swap it out rather than replacing the entire garment. I customize each leg independently, mixing textures and colors to match different occasions or accommodating fit variances between legs. The reinforced seams extend wear life considerably, and I’ve dramatically reduced textile waste since damaged panels get replaced individually. I construct these panels from high-quality materials like reinforced leather or durable synthetic fabrics that withstand repeated attachment and detachment. This modular approach costs more initially, but the long-term savings and versatility make it worthwhile for anyone building a sustainable wardrobe that minimizes waste and maximizes use.
Retro 1970S Disco-Inspired Chaps With Flared Legs

When I first discovered retro 1970s disco-inspired chaps, I couldn’t resist the urge to recreate that legendary dance floor energy in my own designs. I started with flared leg patterns that dramatically widen below the knee, ensuring unrestricted movement for dancing. Metallic lamé fabrics became my go-to choice, paired with sequined accents along the outer seams to catch every light beam. I incorporated polyester and spandex blends for stretch and comfort, fitting the waist snugly while keeping the flared legs loose. Beginner-friendly projects with minimal seams make these designs accessible for all skill levels. Bold disco colors like purple, orange, and red added authentic vibrancy. I finished with gold-toned hardware and ruffled trims at the hem. Drawing inspiration from jumpsuits with flares that defined late 70s disco themes, these chaps capture the era’s signature silhouette. The result? Chaps that transform any wearer into a disco sensation, ready to dominate the dance floor with pure 1970s glamour.
Snap-Fastening Chaps for Easy On-and-Off Around Boots

Dancing the night away in disco chaps is fantastic, but let’s be honest—pulling them on and off over cowboy boots can turn into an awkward wrestling match. That’s where snap-fastening chaps become your best friend! I love using sturdy snap fasteners along the outer leg seam—they create a quick-release system that opens completely for easy boot access.
Here’s my approach: First, reinforce the fabric with interfacing where you’ll place snaps. Mark placement points every 4-6 inches for secure closure. Use a hammer-and-anvil method or specialized press tool to install four-part snap sets. Space them ergonomically so they align perfectly when closed.
Choose metal snaps for leather chaps or heavy-duty plastic ones for fabric versions. For lighter fabric chaps, use woven interfacing in snap areas to prevent tearing and ensure the snaps hold firmly through repeated use. The result? Chaps that slip on effortlessly while staying secure during wear. Pure convenience meets cowboy style!
Embroidered Custom Appliqué Chaps for Personal Expression

If you’re ready to transform plain chaps into wearable art, embroidered custom appliqué is where creativity meets craftsmanship. I’ll walk you through this rewarding technique that adds personality to your riding gear.
Start by digitizing a trace stitch in your embroidery software to mark precise placement. When the machine pauses after the outline, position your appliqué fabric—cotton, denim, or suede work beautifully—over the traced area. The machine will tack it down, then stop for trimming.
Use sharp curved scissors to trim close to the stitching line. Resume for the final satin stitch border.
I love combining textures like leather with floral cotton for visual impact. Secure loose threads with Fray Check, and reinforce high-stress areas with bar tacks. This approach reduces stitch count compared to traditional embroidery while maintaining the bold visual impact your chaps deserve. Your custom Western motifs or logos will make your chaps unmistakably yours!
Double-Layered Wind-Resistant Chaps for Outdoor Work

Working outdoors in harsh weather taught me one essential lesson: standard chaps simply won’t cut it when wind and cold are your constant companions. I’ve discovered that double-layered construction with wind-resistant fabrics like 4-way stretch nylon creates remarkable protection. Here’s my approach: I start with an outer layer of ripstop fabric treated with PFC-Free DWR coating, then add a windproof TPU membrane that blocks gusts while releasing moisture. Between layers, I incorporate fleece insulation for warmth retention. I reinforce all seams with lockstitching to prevent failures during demanding work. The key is including zippered vents for temperature control and an adjustable waistband for layering flexibility. For even greater functionality, I install calf-high side zips that allow me to easily pull the chaps over my boots without fumbling with laces. Adding reflective strips enhances safety during early morning or evening shifts. These chaps transform outdoor work from miserable endurance tests into comfortable, productive days.
Streamlined Garter Chaps Without Buckles for Sleek Aesthetics

When I ditched traditional buckles for garter-style closures, my chaps transformed from clunky gear into sleek, modern pieces that move with my body. I use elastic or stretchy fabric straps positioned at the calf or thigh, creating a clean silhouette without metal hardware. For construction, I reinforce attachment points with double stitching—garters take stress during wear, so durability matters. I’ve found 1-inch elastic works perfectly for secure hold without cutting into skin.
The fit advantage is remarkable: garters adapt to muscle movement and accommodate size fluctuations throughout the day. I measure carefully before cutting, since there’s no buckle adjustment later. For materials, I combine full-grain leather panels with stretchy garter components for durability and comfort. Consider adding mesh or fishnet panels to the design for enhanced breathability and a bold festival-ready aesthetic. Whether you’re riding horses or creating festival wear, this streamlined approach eliminates bulk and snag points while maintaining that polished aesthetic.
Mid-Rise Denim Chaps With Topstitched Belt Loops

Mid-rise denim chaps strike the perfect balance between coverage and comfort, sitting right at your natural waistline where your body bends most easily. I love working with denim fabric because it provides the structure and durability these statement pieces need.
Start by cutting your jean panels to shape, removing the crotch and seat areas. Finish all edges with double-fold bias tape or overlock stitching to prevent fraying. When forming belt loops, fold the upper edges to enclose raw edges, then topstitch with contrasting heavy-duty thread for that classic denim look. I always bar-tack the loop ends for extra stability.
Sew inner and outer leg seams with half-inch allowances, then add topstitching after turning right-side out. Try distressing or adding decorative patches before assembly for personalized flair!
Festival-Ready Patterned Chaps With Decorative Embellishments

Festival-season chaps demand fabrics that catch every spotlight and shimmer with movement—think holographic materials, bold animal prints, or eye-catching stripes that transform you into a walking art installation. I always start by selecting modular patterns that let me mix leg silhouettes with custom stripe placements, then cut my panels from durable faux leather or vinyl.
The real magic happens with embellishments. I securely stitch sequins, rhinestones, and metallic piping along side seams—never glue them, since they need to survive dancing and laundering. For adding rhinestones and appliqués with professional techniques, instructional video resources provide detailed demonstrations that ensure your embellishments stay secure through wear. Custom garter straps get decorative buckles, while bias tape in contrasting colors finishes edges beautifully. For versatility, I attach removable chains to belt loops. Install your zipper at inner leg seams for easy dressing, and you’ll have performance-ready chaps that withstand multi-day festivals.
Professional Bias Tape Finished Chaps for Polished Edges

Since nothing distinguishes amateur chaps from professional ones faster than their edge finishing, I always reach for bias tape when I want that high-end, gallery-worthy look. I start by trimming my chaps edges perfectly even, then select double-fold bias tape that harmonizes with my fabric.
Here’s my foolproof method: I align the tape’s right side to my chaps’ right side, maintaining gentle tension around curves. After stitching, I trim the seam allowance to 0.5 cm and notch curves so everything lies flat. Then I fold the tape over completely, hiding all raw edges, and edgestitch 1-2 mm from the edge.
I always press immediately with steam, using a tailor’s clapper on curves. For curves, I ease the bias tape gradually while pinning, using plenty of pins to secure it smoothly around the contours. This double-stitch approach prevents fraying and creates that crisp, competition-worthy finish.
Conclusion
I can’t wait for you to plunge into these chaps sewing projects! Whether you’re drawn to classic Western fringe or bold festival-ready designs, there’s something here that’ll match your style perfectly. Start with a simple pattern if you’re new to the craft, then work your way up to more complex details like garter straps and embellishments. Trust me, once you create your first pair, you’ll be hooked. Happy sewing!

Keep reading
20 Latest Crochet Neck Warmer Ideas To Try In 2025!
Link up with the 20 best crochet neck warmers that blend warmth and style—discover which designs will transform your winter wardrobe!
20 Amazing Crochet Jewelry Ideas
Amazing crochet jewelry ideas await you, featuring unique designs that will inspire your creativity and elevate your accessory game to new heights.
20 Amazing Crochet Kit Ideas
Navigate through 20 amazing crochet kit ideas that spark creativity and joy; discover the perfect project to ignite your crafting passion!
Need personal guidance?
Talk to an advisor
Our care experts are here to help you make the right choice — for free.