15 Best Bow Sewing Ideas You Need To Try!
I’ll be honest—I used to think sewing bows was too fiddly until I made my first fabric hair bow for my daughter’s birthday. That simple project opened up a whole new world of possibilities, from elegant gift toppers to charming shoe clips. Now I’ve collected fifteen tried-and-true bow techniques that range from beginner-friendly to impressively intricate. Each one serves a different purpose, and I’m excited to walk you through my favorites, starting with the most versatile options you’ll use again and again.
Key Takeaways
- Classic fabric hair bows use satin ribbon with center stitching and alligator clips for easy attachment and polished finish.
- Formal bow ties require interfacing for structure, with silk or velvet fabric matched to lapel width proportions.
- Gift wrapping bows layer floral satin ribbon with center loops, secured by staples and finished with dovetail cuts.
- Detachable clothing bows use medium-weight cotton with metal snaps for blouses and ribbon clips for shoes.
- Decorative home bows need stiff interfacing cores wrapped in burlap or cotton, reinforced at stress points with wire.
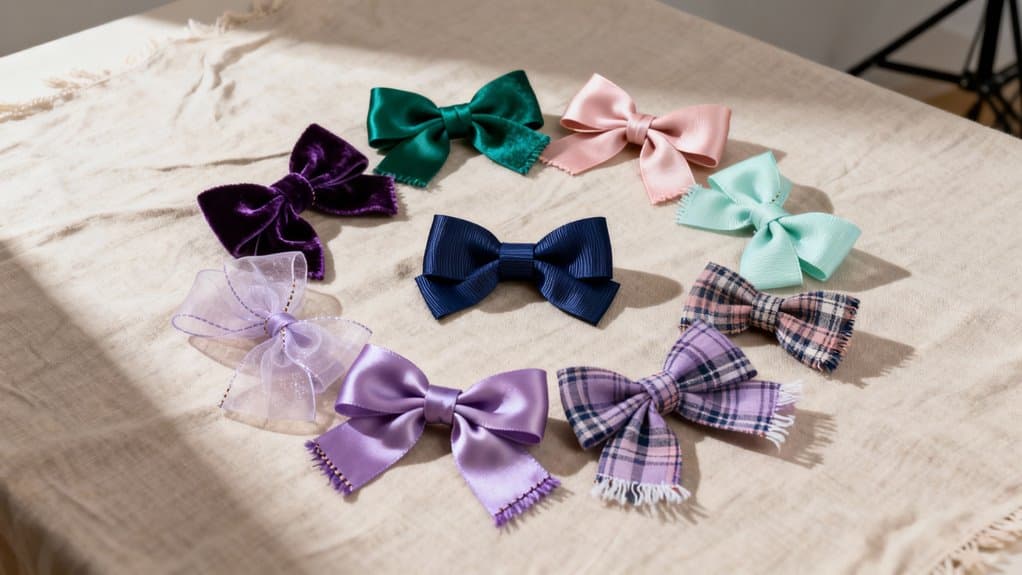
Classic Fabric Hair Bow With Clip Attachment

Creating a classic fabric hair bow from scratch transforms simple ribbon into a charming accessory that rivals anything you’d find in stores. I’ll walk you through my go-to method that’s perfect for beginners.
Start by cutting your satin or cotton ribbon to your preferred length. Choose a ribbon color that complements the outfit you plan to wear with your bow. Form two equal-sized loops by folding the ribbon, then pinch the middle to create that distinctive bow shape. I secure mine by stitching straight down the center with my sewing machine—it’s incredibly quick. Additionally, consider using various fabrics such as velvet or silk for a more luxurious look.
For the finishing touch, cut a smaller center piece measuring 1½” x 2½”. Wrap it around the middle and hand-stitch it close to the bow body for an invisible closure. Finally, attach an alligator clip to the back using hot glue. You’ve created a polished, professional-looking bow!
Elegant Layered Bow for Gift Wrapping

A stunning layered bow transforms any wrapped gift into something truly special—and it’s easier to master than you might think. I start with floral satin ribbon, creating a center loop as my foundation. Then I build incrementally larger loops on each side, using a paperclip to hold everything in place. The key is making each layer slightly bigger than the last—this creates beautiful dimensionality. For added flair, consider using themed ribbons that reflect the occasion for an even more personalized touch.
Once I’m satisfied with the symmetry, I secure everything with a stapler, then wrap additional ribbon around the center to hide the mechanics. I always cut the ribbon tails into dovetails for that polished finish. For special occasions, I’ll mix metallic or patterned ribbons between layers. Wired-edge satin ribbons help maintain the bow’s shape beautifully, ensuring your creation stays perfect throughout the gift-giving occasion. The result? A sophisticated, professional-looking bow that elevates any gift presentation.
Simple Tie-On Bow for Furniture Decoration

Transform your plain furniture into something memorable with tie-on bows—they’re my secret weapon for quick, dramatic decorating. I always choose satin or organza at least 2.5 inches wide for maximum impact, keeping the shiny side facing out.
Here’s my foolproof method: align both sash ends evenly on your chair back, hold taut, then tie like shoelaces creating two loops. The key is maintaining tension while shaping—this prevents drooping. I fan out the loops and tails for fullness, checking there’s no twisting. For slippery surfaces, I’ll secure with hidden pins. Adding a decorative brooch at the center elevates the look instantly, making it similar to themed designs that can be incorporated into various decor styles. This approach works beautifully on classic Chiavari chairs and standard banquet seating alike.
I’ve transformed rental chairs for weddings in under five minutes each. It’s beginner-friendly, budget-smart, and completely reversible.
Structured Bow Tie for Formal Fashion

While decorative bows bring charm to home spaces, formal bow ties demand a different level of precision and purpose. I’ve learned that mastering self-tied bow ties feels like a rite of passage into sophisticated dressing. Incorporating reinforcement methods like interfacing can help maintain the bow’s structure and elegance.
Start by draping the tie around your neck with the right end 1.5 inches lower. Cross the longer end over, creating an X-shape, then loop it through the neck opening. Fold the shorter end horizontally for your front loop, drape the longer end over it, and push this new fold through the small opening behind.
I prefer silk for its refined sheen with wool suits, while velvet creates stunning contrast for evening events. Match your bow tie’s proportion to your suit’s lapel width—batwing styles complement slim-cut suits beautifully. For standard notch lapel suits, butterfly bow ties create a timeless, classic appearance that never goes out of style.
Cascading Multi-Loop Bow for Wedding Chair Covers

Wedding chair decor transformed my perspective on fabric artistry when I first attempted cascading multi-loop bows for my sister’s reception. I discovered that layering organza sashes in decreasing lengths creates that stunning waterfall effect everyone admires.
Here’s my streamlined approach: wrap your primary sash around the chair back, twist the ends, then pull them through to form your first loop. Layer additional sashes of varying lengths, securing each with floral wire. I learned to fluff each loop individually for volume and symmetry.
Don’t skip embellishments—I hot-glued a single pearl brooch to each bow’s center, elevating the entire look. Pro tip: practice your technique beforehand. I mastered my method in twenty minutes, making setup day effortless and stress-free. For added creativity, consider using different fabrics to enhance the texture and appearance of your bows.
Mini Bow Embellishments for Baby Headbands

My daughter’s baby shower last spring inspired me to explore smaller-scale bow projects, and I quickly fell in love with creating mini bow headbands. I discovered that soft fabric strips between 6-8 inches work perfectly for these delicate accessories. One of the most fun aspects of sewing mini bows is the ability to personalize them with various fabric choices, allowing you to create unique looks for every occasion.
Here’s my go-to method: I fold the fabric ends inward, create a simple knot in the center, then fluff the loops for fullness. For attachment, I’ve found that sewing an elastic band onto the bow’s back provides the best stretch and fit. Hot glue works wonderfully when converting bows into alligator clips.
I love mixing and matching colors with different headbands for versatility. To keep your bows looking fresh, hand wash gently to prevent the fabric from fraying over time. Pro tip: repurpose old headbands and fabric scraps to reduce waste while creating adorable accessories that coordinate with baby’s outfits perfectly.
Oversized Statement Bow for Dress Waistlines

Creating an oversized statement bow transforms an ordinary dress into a show-stopping piece that commands attention at any event. I measure my waist and add 5-10 inches to determine the bow width, using 3-inch strips for balanced proportions.
I fold the fabric lengthwise, sew the edges, then turn it inside out for a clean finish. After forming the bow, I wrap a matching strip around the center to conceal the gathered sections and hand-stitch it permanently. Choosing fabrics that hold shape, like cotton or silk, enhances the overall look of the bow.
For placement, I position the bow below the zipper line so the dress opens easily. I’ve found princess dart construction works best, preventing fabric distortion from the bow’s weight. Adding hook-and-eye fasteners creates a detachable option, letting me transform one dress for multiple occasions. I always iron interfacing on the wrong side of my fabric rectangles to give the bow the stiffness and body it needs to maintain its dramatic shape throughout the day.
Twisted Ribbon Bow for Handbag Accessories

When I discovered twisted ribbon bows, they completely changed how I accessorize my handbags. I start by selecting ribbons in contrasting colors and textures—mixing satin with lace creates stunning depth. Classic neckties can inspire different styles of bows, allowing for unique interpretations.
Here’s my simple process: I twist the ribbon as I fold it to create that gorgeous 3D effect, then secure the center with needle and thread. For attachment, I prefer using clips so I can switch bows between bags easily.
My favorite trick? I add tiny rhinestones or beads to the center for extra sparkle. I’ve found that placing these bows on shoulder straps gives the chicest look. For tote bags, I like to loop the ribbon around a handle and let it cascade down for a breezy effect.
Don’t hesitate to experiment with metallic ribbons for evening bags or themed ribbons for holidays. I’ve even created tiered versions for dramatic flair!
Ruffled Edge Bow for Spring Clothing

While handbag accessories offer quick style updates, sewing ruffled edge bows for spring clothing lets me transform entire outfits with soft, romantic details. I start by selecting lightweight silk or chiffon, cutting strips 1.5–3 times my desired finished length. Pre-washing prevents shrinkage disasters I’ve learned from experience.
I sew two parallel basting stitches along each strip’s top edge, then gently pull the bobbin threads to gather the fabric evenly. Once gathered to half the original length, I layer ruffles from widest to narrowest, stitching them together at the center. A fabric strip wrapped around the middle conceals my stitches beautifully.
I attach these bows to necklines or sleeves for instant feminine appeal. For shoulder placements, I center shoulder straps perpendicular to the shoulder line using approximately 35cm length for smaller bow styles. The key? Mark center lines carefully and press ruffles before assembly for professional results.
Stiffened Bow With Batting for Home Decor

Large-scale decorative bows have transformed my living room walls and holiday mantels in ways store-bought versions never could. I start by cutting Reflectix insulation board or super stiff interfacing like Pelon 809 Decor-Bond into my desired bow shape. Then I wrap medium-weight cotton or burlap around it, securing with hot glue and creating mitered corners for that professional finish.
For added body, I layer double-sided batting between the fabric and core. This creates sculptural depth while maintaining structure. I pleat the center, cinch it with wire, and construct separate tails that I angle dramatically before gluing them to the back. I typically plan for approximately 20 feet of fabric to ensure adequate coverage for larger bow projects.
The key is reinforcing stress points—especially where the hanging loop attaches. These statement bows withstand seasons of display.
Detachable Shoulder Bow for Blouses

Because I wanted to refresh my favorite blouses without committing to permanent embellishments, I discovered detachable shoulder bows—they’ve become my secret weapon for transforming simple garments into statement pieces.
I cut main bow pieces at 12 x 7.5 inches and a center band at 4 x 4 inches from medium-weight cotton. After stitching right sides together and leaving a turning gap, I clipped the corners for sharp points. Pressing each seam made all the difference in achieving professional-looking edges.
For attachment, I hand-sewed 12mm metal snaps at the shoulder seams—one half on the blouse, one on the bow back. This allows me to snap them on for dressy occasions and remove them easily for washing.
The versatility is incredible; I’ve made bows in contrasting fabrics for accent effects and matching ones for subtle elegance. When working with lighter-weight fabrics, I always add stiff interfacing to maintain the bow’s structure and prevent it from looking limp.
Festive Christmas Tree Bow Topper

Creating a show-stopping Christmas tree topper transformed how I finish decorating each year—instead of settling for generic store options, I now craft oversized bows that become the focal point of my entire tree. I use wired ribbon between 2.5 and 4 inches wide, forming 8–10 loops that I secure with floral wire at the center. After fluffing each loop for volume, I cut tails extending 20–30 inches down the tree’s front. I attach my topper by threading wire through the central knot and wrapping it around the tree’s leading branch. Layering velvet with glitter ribbon adds gorgeous texture, and I always trim the tails at an angle for that polished, festive finish. I enhance the topper by adding berry picks or twigs for natural elements that complement the ribbon beautifully. This simple project saves money while delivering professional-looking results.
Knotted Center Bow for Shoe Clips

Custom shoe clips changed my perspective on accessorizing—I’ve transformed countless plain flats and heels into statement pieces using nothing more than ribbon scraps and inexpensive metal clips.
I cut my ribbon to 8″ x 1.5″ for statement bows, fold the ends toward the center, and secure with hot glue. The knotted center is my signature: I tie a separate piece into a knot, wrap it around the bow’s middle, and glue it at the back. Adding a felt base under the metal clip protects my shoes and strengthens attachment.
I’ve made pairs in under 30 minutes for weddings and everyday wear. Velvet holds its shape beautifully, while grosgrain adds structure. I always heat seal the ends with a lighter to prevent any fraying over time. Best part? They’re completely detachable and reusable across my entire shoe collection.
Vintage-Inspired Bow for Scrapbooking Projects

While removable shoe clips let me swap accessories in seconds, I’ve discovered fabric bows work magic on paper too—especially when I want to capture that nostalgic, handmade quality in my scrapbook layouts.
I start by selecting cotton or linen, then tea-staining it for an aged appearance. I cut rectangles twice my desired size, fold right sides together, and sew around edges, leaving an opening. After clipping corners and turning the piece right side out, I press it flat for a polished vintage finish.
For the signature gathered center, I hand-sew a basting stitch and cinch it tight. I wrap a bow center piece measuring 2.25″ wide by 5″ long around the gathered middle to hide the raw edges. Then I add lace overlays or vintage-style buttons as embellishments. I attach these bows using hot glue or hand stitching, layering them with doilies and distressed papers to create cohesive, timeworn scrapbook pages.
Double-Tailed Bow for Hair Ties and Ponytails

When I discovered double-tailed bows, I instantly fell in love with how they transform ordinary ponytails into statement pieces. I’ve made dozens using shimmer and satin fabrics, and they’re surprisingly quick—just minutes from start to finish.
Here’s what you’ll need: your chosen fabric, a French Barrette clip, hot glue, and basic sewing supplies. I recommend measuring carefully for proportional bows and layering two fabrics for added depth. The sewing is straightforward, even for beginners.
I always secure my bows with both stitching and hot glue for durability. For special occasions, I add pearl embellishments. The best part? You can create them in any color to match different outfits. They’re perfect for casual days and formal events alike, giving you endless styling possibilities.
Conclusion
I’ve been sewing bows for years, and I can tell you—there’s nothing quite like the satisfaction of attaching that first handmade bow to a gift or in your hair. Start with the classic hair bow if you’re new to this; it’s forgiving and builds your confidence quickly. Don’t worry about perfection on your first try. I’ve made countless wonky bows, and honestly, they’re what taught me the most. Grab your fabric scraps and just begin!

Keep reading
20 Latest Crochet Neck Warmer Ideas To Try In 2025!
Link up with the 20 best crochet neck warmers that blend warmth and style—discover which designs will transform your winter wardrobe!
20 Amazing Crochet Jewelry Ideas
Amazing crochet jewelry ideas await you, featuring unique designs that will inspire your creativity and elevate your accessory game to new heights.
20 Amazing Crochet Kit Ideas
Navigate through 20 amazing crochet kit ideas that spark creativity and joy; discover the perfect project to ignite your crafting passion!
Need personal guidance?
Talk to an advisor
Our care experts are here to help you make the right choice — for free.