15 Best Bat Sewing Ideas You Need To Try!
I’ll confess something: my first attempt at sewing a bat ended up looking more like a deformed butterfly. But that hilarious failure sparked an obsession with perfecting bat-themed projects that’s lasted years. I’ve since created everything from tiny felt finger puppets to elaborate Halloween garlands, and I’m genuinely excited to share what I’ve learned. These 15 projects range from beginner-friendly to challenging, so whether you’re just starting out or looking for your next creative challenge, you’ll find something here.
Key Takeaways
- Stuffed bat plush toys use safety eyes and weighted pellets, with free YouTube tutorials available for beginners.
- Bat appliqués with fusible web transform clothing and bags, covering stains while adding decorative Halloween flair.
- Quick bat accessories include glitter hair clips under 20 minutes and felt ear headbands with wire structure.
- Reversible bat wing capes feature scalloped edges and interfaced neckbands for dramatic, comfortable costume wear.
- Bat quilt blocks in 6″ or 12″ sizes combine appliqué techniques with contrasting fabrics for wall hangings.
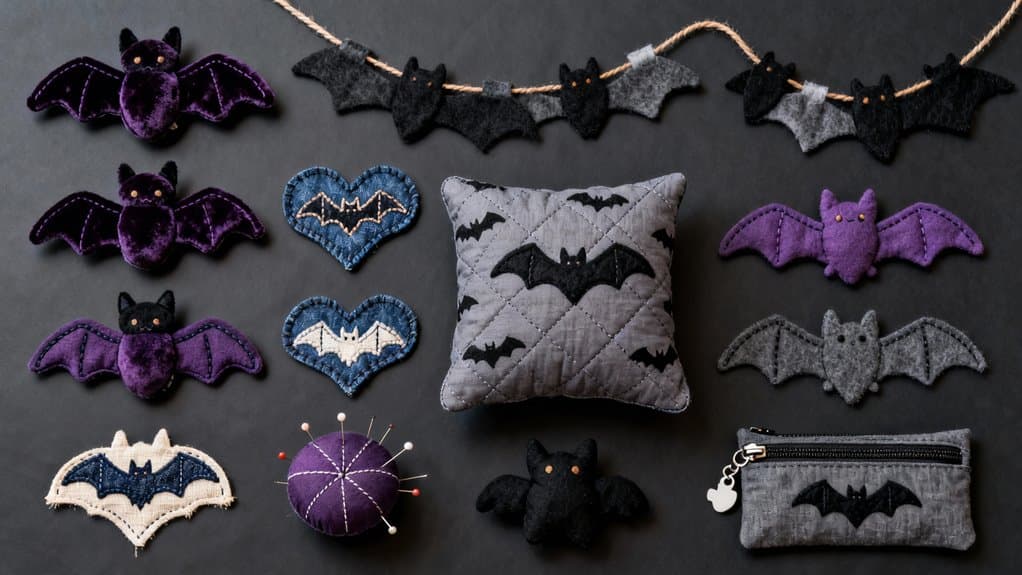
Adorable Stuffed Bat Plush Toy

I’ll never forget the first time I stitched up a stuffed bat plush—those oversized ears flopping adorably as I turned it right-side-out made all the careful seam work worthwhile. These intermediate-level patterns typically feature sitting designs that stand independently, measuring around 6 inches tall with a 12-inch wingspan. I use separate pattern pieces for wings, ears, head, and body, allowing creative fabric mixing—Minky for softness, contrasting cotton for inner ears. The tricky parts involve sewing opposing curves and attaching those delicate wings, but step-by-step photo tutorials guide you through pinning, darts, and ladder stitching. I always add 9mm safety eyes and embroider a toothy grin for personality. Creative customization options include adding unique colors or embellishments to make each bat truly one-of-a-kind. Weighted poly-pellets in the base help mine sit perfectly on shelves. If you’re new to this project, a free video tutorial on YouTube walks you through the entire 21-minute process without requiring any purchase.
Bat Appliqué for Clothing and Bags

Something magical happens when you iron a bat silhouette onto a plain tote bag—suddenly it transforms from everyday to eye-catching. I’ve found that fusible web makes this process foolproof, even for beginners.
Start by tracing your downloaded bat template onto Heat n Bond, remembering to reverse symmetrical patterns. I prefer black felt from the bolt for bags—it holds up beautifully through repeated use. For clothing, pre-starched cotton gives those wing points extra crispness. Additionally, consider incorporating decorative finishes like embroidery or patchwork for an added touch of uniqueness.
Position your bat centrally or asymmetrically (I love the off-center look on jackets), then iron and secure with zig-zag stitching. Don’t skip the perimeter stitching if you want wash durability. Consider using heavyweight interfacing behind your bag band fabric to add structure and support to the finished project.
Here’s my favorite trick: use bat appliqués to cover stains on vintage pieces, making repairs both decorative and practical.
Halloween Bat Garland Decoration

When October arrives, I always reach for black cardstock first—it’s the fastest way to transform a bare mantel into a Halloween centerpiece. I use the fold-and-cut method: fold cardstock in half, draw half a bat along the crease, then cut while folded for perfect symmetry. Mixing small, medium, and large bats creates visual interest that makes the garland feel dynamic rather than repetitive. Adding textural variations in the materials, like using patterned paper or glitter, can enhance the overall look of your bats.
For assembly, I tape each bat vertically to ribbon at even intervals, then create loop knots at both ends for easy hanging. The entire project takes under an hour and costs less than $10. I’ve also experimented with wire instead of ribbon—it allows for adjustable spacing and creates beautiful draping effects. This craft project is suitable for kids and adults alike, making it a perfect activity for family bonding during the Halloween season. Last year, I paired my bat garland with a feather wreath, and the layered look became my favorite mantel display.
Bat-Themed Table Runner

After making bat garlands for years, I’ve discovered that table runners offer something special—they stay put throughout the entire Halloween season without needing adjustment.
I love adapting Cluck Cluck Sew’s bat pattern into a table runner using just three blocks instead of the full twelve. My standard version measures 15.5″ x 46″, perfect for most dining tables. For narrower spaces, I’ll make the 11″ x 55″ variation.
Here’s my fabric shopping list: 23″ of black fabric for bat silhouettes and 46″ of contrasting fabric for backgrounds. I create the quilt sandwich using Fairfield batting and secure layers with KK 2000 spray adhesive. Sustainability benefits can be gained from repurposing fabric scraps during this project.
My favorite technique? Quilting with Sulky Glowy thread around each bat—they literally glow in the dark! I quilt-in-the-ditch first, then add echo quilting a scant 1/4″ beyond each bat for dimension. Before quilting with the Glowy thread, I do a final press using low heat to ensure smooth stitching.
Felt Bat Finger Puppets

I’ve sewn dozens of these little felt bats over the years, and they’ve become my go-to Halloween craft for keeping kids entertained during parties. The construction couldn’t be simpler—I cut front and back body pieces from brown or black felt, then use a whip stitch to connect them, leaving the bottom open for fingers. Before joining the pieces, I attach the head with polyfill stuffing for dimension, glue on tiny ears, and sew small beads as eyes. My secret is using Beacon Fabri-Tac to temporarily position small pieces before stitching—just avoid placing glue where you’ll sew. I prefer a running stitch for facial details and a backstitch for durability. The estimated time for completing one bat finger puppet is typically 3 to 4 hours, making it a perfect afternoon project. Kids adore customizing their bats with different expressions and colors, and this project can easily be adapted to include different fabric choices for added creativity.
Bat Wing Cape for Costumes
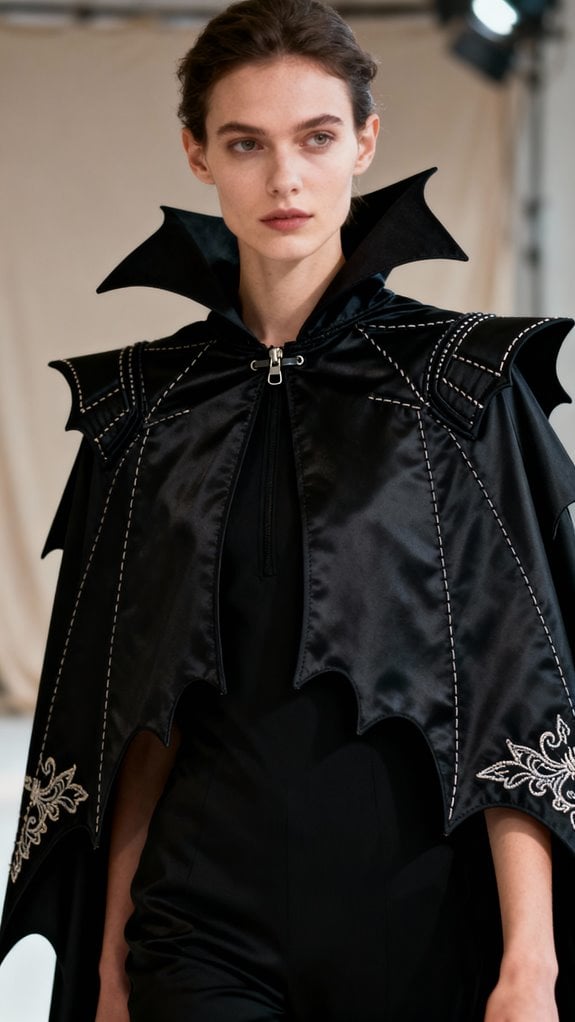
Though my sewing machine groaned in protest the first time I fed yards of fabric through for a bat wing cape, I’ve since perfected a technique that transforms simple materials into showstopping Halloween costumes.
I always start with main and contrast fabrics for reversible designs—black on one side, purple or red on the other. The secret lies in creating those dramatic scalloped edges that make the wings look realistic when you spread your arms. I’ve learned to add interfacing to the neckband for stability, which prevents that awkward sagging I experienced with my first attempt. Clear step-by-step instructions are essential to ensure each wing is symmetrical and effective.
For rushed situations, I’ll admit to using trash bags with strategic stapling. The entire project takes under 10 minutes, making it perfect for last-minute costume emergencies. However, nothing beats a properly sewn cape with piping details and topstitching. I pair mine with bat ears and matching accessories for complete transformation.
Embroidered Bat Motif Projects

Embroidered bat motifs have become my go-to way to add personality to everyday items without committing to full costume pieces. I’ve stitched bats onto tote bags using simple backstitches—perfect for beginners who want instant gratification. My favorite project was upcycling old curtain panels into a Halloween tote with boxed corners and contrast handles. Additionally, using variety of fabrics can enhance the texture of your projects and make them stand out even more.
For something more three-dimensional, I tried Kiriki Press’s bat plush kit. The screen-printed pattern made placement foolproof, and the 4.5″ finished doll now sits on my bookshelf year-round.
I’ve also experimented with floral bat designs from DMC, combining gothic silhouettes with botanical elements on throw pillows. The muted color palette keeps them sophisticated enough for everyday display. When working with curves, I’ve found that using smaller stitches creates smoother outlines and prevents jagged edges in bat wing details. Whether you’re hand-stitching patches or using machine embroidery for consistency, bat motifs elevate accessories effortlessly.
Bat Eye Mask for Sleep or Costumes

A well-fitted bat eye mask serves double duty in my sewing rotation—I’ve made plush versions for actual sleep and structured ones for last-minute costume needs. For sleep masks, I line cotton or batik outer fabric with velour against the skin, sandwiching lightweight batting between layers for gentle cushioning. I always add a slight dip at the nose bridge by tracing around a jar lid, then trimming that section for breathability. Quarter-inch elastic works perfectly for sleep versions—it holds without digging into your head overnight. When I’m creating costume masks, I skip the batting and add interfacing instead to maintain those dramatic bat-wing edges. Novelty bat-print fabrics eliminate embroidery work entirely. The pattern requires minimal yardage since eye masks are small accessories that work perfectly for using up fabric scraps. Additionally, using clear materials lists can help streamline your sewing process and keep everything organized. Velcro straps let kids adjust fit easily during Halloween activities.
Bat Quilt Block Design

Beyond simple eye masks, I’ve found bat motifs translate beautifully into quilt blocks that work up surprisingly fast. I typically start with 6″ or 12″ finished blocks using straight-line piecing—just squares, rectangles, and half-square triangles for the wings. My go-to fabrics are black cotton scraps paired with gray or purple backgrounds, though I’ve experimented with minimalist silhouettes on low-volume prints for modern appeal.
For construction, I cut all base pieces first, stitch the body sections, then add triangle wing tips. When I want extra dimension, I’ll applique curved wing details with top-stitching. A rotary cutter and heat-erasable marker keep everything precise. I also keep spray starch on hand to help stabilize the fabric pieces and reduce stretching during assembly.
These blocks shine in Halloween wall hangings or lap quilts, and I love following quilt-alongs that inspire creative layouts mixing bats with stars and moons.
Bat-Shaped Hair Clips and Brooches

I’ve been making bat-shaped hair clips for years, and they’ve become my favorite quick-sew Halloween accessory because they work up in under 20 minutes. I cut rectangular fabric pieces—usually 4.5 by 3.5 inches for standard bows—from black glitter material. After creating four folds along the center, I secure them with thread wraps, keeping them loose enough to maintain volume. Then I wrap a fabric scrap strip around the middle and hot glue a double-pronged clip to the back.
For non-fabric versions, I trace bat templates onto Shrinky Dinks plastic, color them with black Sharpie, and bake at 325°F for two minutes. They shrink to one-third their size. I immediately flatten any curled edges with a glass lid before super gluing them to alligator clips. When attaching the clips, I alternate which side of the alligator clip hinge I glue to, giving me more options for how I wear them in my hair.
Patchwork Bat Throw Pillow

Creating patchwork bat throw pillows transformed my scrap fabric bin from chaotic overflow into Halloween treasure last October. I cut bat silhouettes from varied fabrics—felt, cotton blends, even leftover sherpa—and arranged them on black sherpa backing before securing with my machine. The symmetry trick saved me: fold your template in half, trace, and cut for perfect wings every time.
I stuffed mine with 32 ounces of poly-fil, using scissors to push filling into wing corners for even distribution. Don’t overstuff like I initially did—my seams strained noticeably. Leave a 5–6″ opening for turning, then hand-stitch it closed. I added button eyes and topstitched my appliqués for durability. For a luxurious finishing touch, I attached rhinestones using hot glue to create sparkling eyes that catch the light. My family now fights over these pillows every autumn, proving they’re worth the effort.
Bat Ear Headband

When my daughter announced she needed a bat costume for school the next morning, I panicked until I remembered the plain black headband gathering dust in my craft drawer. I cut four identical triangles from black felt using a quick template I sketched, then sandwiched florist’s wire between two layers for each ear. A few dots of hot glue secured everything perfectly. The game-changer was making small snips at the base and pinching them together before attaching—this created that upright, perky bat ear look. I wrapped the headband in felt for comfort and glued the ears on top. The hidden wire inside let me bend and adjust the ear shapes until they looked just right. Ten minutes later, we had adorable bat ears that paired perfectly with her black outfit and homemade wings.
Trick-or-Treat Bat Tote Bag

Last October, my neighbor’s son showed up at our door with a flimsy plastic pumpkin bucket that split open mid-trick-or-treat, spilling candy all over my porch. That’s when I decided to sew him a sturdy bat tote bag that’d last for years.
I started with black felt for durability and cut a simple rectangular pattern with rounded corners. Using fusible web, I attached bat wing appliqués to the front, then added felt eyes and a mouth. The key is using wide cotton webbing for handles—they won’t tear under candy weight.
For lining, I doubled up the fabric to prevent any Halloween haul disasters. An open embroidery foot on my machine helped with precise topstitching around the wings. The whole project took about two hours, and he’s used it three Halloweens running. If you prefer woven fabric, you’ll get a more structured tote with better shape retention throughout the night.
Mini Bat Pincushion

My sewing desk used to look like a pin graveyard—straight pins scattered everywhere, stabbing me at random moments. That changed when I discovered mini bat pincushions. I printed a simple template with body and wings, cut two pieces from black quilting cotton, and placed them right sides together. After sewing with a 3/8″ seam allowance, I clipped the curves for a smoother silhouette. The wings became genius extra pin storage—no more overcrowding! I stuffed mine with polyester batting and added button eyes for personality. For extra functionality, I mixed in a handful of crushed walnut shells to give the base more weight and help keep my pins sharp. At just 3 inches wide, it’s perfect for my portable kit. I’ve since made purple and patterned versions as gifts. The weighted base keeps it stable, and honestly, it makes pinning feel festive year-round.
Bat Mittens With Wing Tips

Since I’ve always had cold fingers during autumn photo shoots, I decided to upgrade basic mittens with posable bat wing tips that actually moved. I started by drafting the wing pattern with chalk on black stretch fabric, creating sharp, pointed tips for dramatic effect. The secret is inserting chenille stems along each wing section—they let you pose the wings however you want.
Sewing over the wires requires patience. I used my machine’s handwheel and needle-down function to carefully navigate the stems without breaking needles. A zigzag stitch secured everything perfectly. I added fabric scraps for accent details at the wing tips. The non-fray fabric eliminated the need to finish any raw edges, saving me significant time during construction.
These mittens transformed into my favorite Halloween costume accessory, keeping my hands warm while maintaining that Gothic aesthetic I love.
Conclusion
I’ve fallen in love with bat sewing projects over the years, and I’m confident you’ll find them just as enchanting! Start with something simple like the felt finger puppets—they’re what got me hooked. Don’t worry if your first bat looks a bit wonky; mine certainly did! The beauty of these projects is they’re forgiving and fun. Grab your fabric scraps, fire up that sewing machine, and let’s create something wonderfully batty together!
Keep reading
20 Latest Crochet Neck Warmer Ideas To Try In 2025!
Link up with the 20 best crochet neck warmers that blend warmth and style—discover which designs will transform your winter wardrobe!

20 Amazing Crochet Jewelry Ideas
Amazing crochet jewelry ideas await you, featuring unique designs that will inspire your creativity and elevate your accessory game to new heights.

20 Amazing Crochet Kit Ideas
Navigate through 20 amazing crochet kit ideas that spark creativity and joy; discover the perfect project to ignite your crafting passion!
Need personal guidance?
Talk to an advisor
Our care experts are here to help you make the right choice — for free.