15 Best Ball Sewing Ideas You Need To Try!
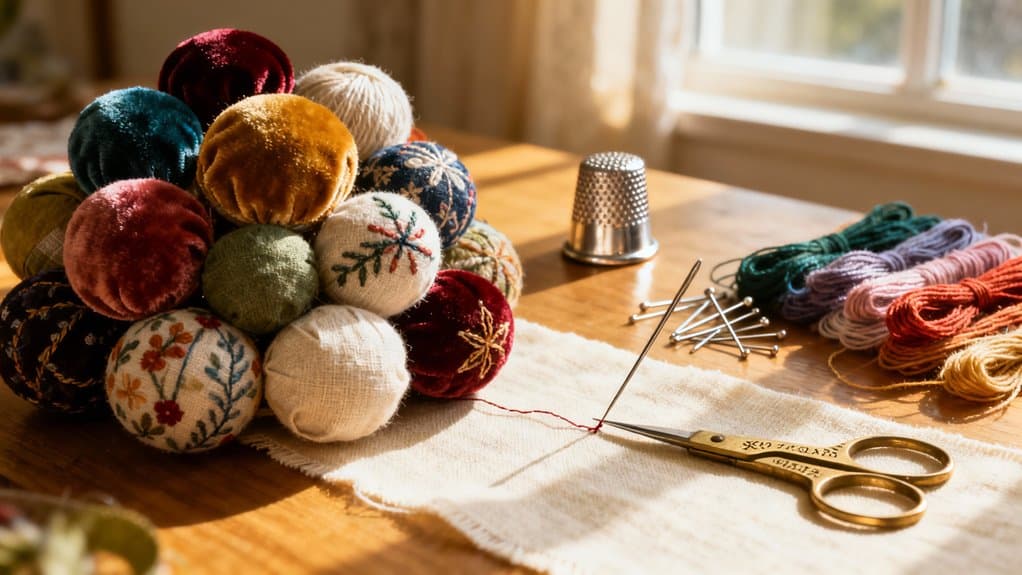
I’ve been sewing balls for years, and I can tell you there’s something incredibly satisfying about transforming flat fabric into a three-dimensional sphere. Whether you’re crafting sensory toys for babies, creating juggling sets, or designing decorative pieces for your home, these 15 projects offer endless creative possibilities. I’m excited to share my favorite techniques with you—from beginner-friendly six-panel designs to advanced appliqué spheres. Let me show you which projects will transform your fabric stash into something truly special.
Key Takeaways
- Classic fabric balls use cotton segments with 1/4-inch seams, ideal for beginners creating durable toys or decorative pieces.
- Sensory balls incorporate varied textures, ribbons, and crinkle materials to stimulate infant development and hand-eye coordination.
- Quilted patchwork spheres utilize twelve pentagon pieces, perfect for scrap-busting projects with optional rattle inserts.
- Juggling balls offer customization options including seven size choices, adjustable fill weights, and 4-panel or 12-panel designs.
- Decorative techniques like cross-stitch panels and appliqué transform basic spheres into artistic, themed display pieces.
Classic Six-Panel Fabric Ball for Beginners

The classic six-panel fabric ball stands as one of the most rewarding beginner sewing projects you’ll encounter. I love how this design uses simple cotton or duck cloth, making it both durable and easy to work with. You’ll cut six pieces from your chosen fabric, including a standard 1/4 inch seam allowance for smooth finishing.
Here’s my process: I sew pieces right-sides together, always backstitching for durability. Pressing seams open reduces bulk considerably. The magic happens when you assemble two halves, leaving an opening for poly-fil stuffing. Once you hand-stitch the opening closed, you’ll have a perfect 6-inch ball. For stronger construction, use a shorter stitch length of 1.5-2mm when sewing the seams together. This project not only boosts your sewing skills but also introduces you to the importance of proper seam allowance for a professional finish.
I recommend cutting fabric on the bias for rounder results. Experiment with different color combinations to create unique patterns!
Sensory Taggie Ball With Ribbons and Textures

While six-panel balls offer wonderful simplicity, I’m excited to show you how adding ribbons and varied textures transforms a basic fabric ball into a sensory powerhouse for babies and young children. I select different fabric types—minky, corduroy, satin, cotton—creating a kaleidoscope of colors and feels. I attach ribbons and tags to each seam, giving little fingers something to stroke and explore. The varied textures stimulate tactile awareness while bright colors encourage reaching and visual tracking. I’ve watched babies develop hand-eye coordination through rolling and squeezing these balls. They’re particularly beneficial for children with sensory processing needs, helping increase texture tolerance. The compact design makes grabbing easy, and the ribbons provide comfort for self-soothing. For added sensory engagement, I sometimes include bells or loud materials inside the ball to stimulate hearing alongside the visual and tactile elements. This project beautifully combines motor skill development with emotional regulation, showcasing the importance of sensory stimulation techniques in early childhood development.
Montessori Puzzle Ball for Infant Development

Among Montessori materials designed for infant development, the puzzle ball stands out as one of the most thoughtfully engineered toys I’ve encountered. Its geometric shape rolls slowly and unpredictably, preventing frustration while challenging your baby’s tracking abilities. I love how the multiple textured fabrics provide rich sensory feedback, while numerous grasp points accommodate tiny fingers perfectly. Additionally, creating a sensory-rich environment enhances a child’s engagement and exploration.
You can introduce it as a hanging mobile for newborns, then progress to tactile exploration around three months. By five months, it becomes essential for tummy time activities. The ball strengthens hand muscles, develops hand-eye coordination, and teaches cause-and-effect—especially with an internal bell. It encourages midline crossing and object transfer between hands, supporting both physical coordination and cognitive growth while fostering autonomy through self-directed play. The 12 wedge-shaped sections connect in the middle, creating a lightweight design that babies can easily manipulate and pass from hand to hand.
Quilted Patchwork Sphere From Fabric Scraps

Transforming leftover quilting cotton into a charming patchwork sphere offers one of the most satisfying scrap-busting projects you’ll ever tackle. I’ll show you how twelve pentagon pieces sewn together create this delightful ball that’s perfect for babies and toddlers. To enhance your project, consider using different fabric choices to create visual interest and texture.
Start by cutting three pentagons from each of four different fabrics (36x36cm squares work beautifully). Mark your 5mm seam allowances carefully on the wrong side—precision matters here! Using English paper piecing, join six pentagons around one central piece to form a bowl shape. Repeat for the second hemisphere, then sew them together, leaving a small opening for stuffing.
Fill with polyester fibrefill until it bounces back when squeezed. For added sensory stimulation, nestle a rattle insert in the center of the stuffing before completing the final filling. Hand-stitch the opening closed, and you’ve created a safe, soft indoor toy that efficiently uses your fabric scraps!
Crinkle Sound Baby Ball With Bell Inside

The soft crinkle of plastic combined with a gentle jingle creates irresistible sensory magic for babies—and you can craft this engaging toy in just an afternoon! I layer crinkle material between colorful fabric pieces, adjusting thickness to control sound volume. The key is positioning your crinkle plastic strategically so every squeeze produces satisfying rustles.
I create my pattern with generous seam allowances, then pin carefully since crinkle material gets slippery. After sewing around the edges, I leave a gap for turning and inserting a small bell. Multiple crinkle layers amplify the effect beautifully! I enhance sensory appeal by using textured fabrics like minky and adding ribbon loops. You can even attach teething rings into the ribbon loops for added functionality. Additionally, removable covers can be a great feature if you want to keep the toy clean and fresh.
Before hand-stitching closed, I inspect thoroughly for choking hazards. The result? A durable, enchanting toy that stimulates baby’s developing senses perfectly!
Traditional Quaker Ball With Complex Piecing

While baby sensory balls delight with simple construction, Quaker Balls demand precision and patience that’ll transform you into a true fiber artist! I’m captivated by how geometric shapes—squares, hexagons, and octagons—unite through counted cross-stitch to form perfect spheres. To enhance your crafting experience, consider incorporating personalized decorative touches that reflect your style.
You’ll work on evenweave fabric with cotton threads, following layout maps that guide complex piecing. The assembly challenges you to match diagonal sides, align sections carefully, and maintain even tension while creating that essential curved shape. I rely on backstitch, running stitch, and whipstitch to join pieces seamlessly.
Traditional Quaker motifs bring historical elegance, though you can customize colors and complexity levels. The design showcases 6 large octagons, 8 medium hexagons, and 12 small squares that create the signature three-dimensional structure. Once stitched, stuff your ball with polyfil using chopsticks for even distribution, then whipstitch the final seam. The result? A stunning three-dimensional masterpiece showcasing advanced needlework skills!
Simple Five-Piece Felt Ball Design

For crafters seeking instant gratification, this five-piece felt ball delivers stunning results without the complexity of counted cross-stitch! I’ll cut five identical pointed oval shapes from felt sheets, using cardstock templates for consistency. The key is precise alignment—I’ll pin the tips carefully before sewing pairs together with a small 1/8-inch seam allowance. Adding various materials like cotton or fleece can enhance the texture and durability of the felt ball.
After combining the segments, I’ll leave a small gap for turning the sphere right-side out. Once inverted, I’ll stuff it firmly (but not excessively) with polyester filling, then hand-stitch the opening closed.
The beauty lies in customization—I can mix vibrant colors, add embroidered details, or create various sizes for ornaments, pet toys, or decorative accents. I recommend saving any felt scraps for future embellishments or smaller craft projects. Sharp scissors and patient pinning guarantee professional results every time!
Cross-Stitched Panel Decorative Sphere

Cross-stitch enthusiasts will find their ultimate challenge in creating panel decorative spheres—stunning three-dimensional showcases that transform flat needlework into sculptural art! I’ll guide you through assembling separate stitched fabric pieces into gorgeous quaker balls.
Start by selecting your pattern divided into quarters, sixths, or eighths. I recommend traditional geometric designs featuring octagons and hexagons, though modern seasonal motifs work beautifully too. Stitch your fabric pieces, then carefully align the edges using backstitch for security. Maintaining consistent tension prevents puckering—this is vital! Using interfacing options can also enhance the durability and structure of your stitched pieces.
Curve and join the pieces gradually, watching your sphere take shape. Once assembled, stuff it firmly with polyester fiberfill for professional results. Use straight pins to hold the fabric panels securely in place before final assembly. These spheres make spectacular Christmas ornaments, elegant home décor, or personalized gifts. Customize colors and themes for any occasion!
Minky and Cotton Combination Sensory Ball

Because your little one’s development hinges on rich sensory experiences, I’m thrilled to introduce you to minky and cotton combination sensory balls—brilliant tactile toys that’ll captivate curious hands while building essential skills! These delightful spheres merge plush minky’s soft bubbles and insets with cotton’s squishable lightweight texture, creating varied surfaces that strengthen hand muscles through gripping and throwing. When your child catches, rolls, and chases these multicolored balls, they’re developing hand-eye coordination and gross motor skills simultaneously. The contrasting fabrics enhance tactile processing while providing that calming sensory input overstimulated children crave. They’re particularly wonderful for kids needing extra sensory stimulation, functioning as both fidget tools and developmental aids. These engaging toys exercise the brain similar to how physical activity strengthens muscles, making playtime truly productive. Choose baby-safe, non-toxic materials sized perfectly for tiny hands to explore, squeeze, and manipulate confidently.
Catnip-Filled Pet Enrichment Ball

Your feline friend deserves enrichment that’ll satisfy their natural instincts, and catnip-filled pet enrichment balls deliver exactly that—a compressed sphere of pure *Nepeta cataria* that releases nepetalactone with every bat, chew, and lick! I recommend sewing these spherical toys to maintain potency longer than loose catnip while encouraging active play that prevents obesity. The unpredictable movement sharpens cognitive abilities and satisfies hunting instincts safely indoors. I’ve found these balls provide remarkable stress relief during thunderstorms or vet visits, with post-play relaxation following intense engagement. Choose 100% organic catnip and sturdy construction for durability. The catnip effects typically last 5-15 minutes before your cat experiences temporary immunity for about an hour. Store in airtight containers between uses to preserve effectiveness. Rotate with other toys to prevent desensitization, and always supervise aggressive chewers. Incorporating these into daily routines enhances your cat’s behavioral wellness considerably.
Bias-Cut Fabric Ball for Smooth Curves

Cutting your fabric segments at a 45-degree angle to the selvage transforms ordinary flat pieces into components that’ll curve into gorgeously smooth spheres—this bias-cut technique is the secret behind professional-looking fabric balls! I always cut six identical segments using a paper template positioned precisely at 45 degrees. This diagonal grain gives you incredible stretch and flexibility, allowing each piece to mold beautifully without puckering or flat sides. You’ll notice superior drape that eliminates those frustrating scooped-in edges at the top and bottom. Press seams open between joins and trim excess allowance at points to reduce bulk. If you’re working with fleece, you can skip the bias cutting since fleece stretches in all directions. The result? A perfectly round sphere that’s ideal for juggling props, toys, or decorative pieces. Mix three fabrics—two segments each—for stunning visual impact!
Contrasting Thread Geometric Pattern Ball

The magic happens when I alternate contrasting thread colors at each segment—the pattern *pops* dramatically against the neutral fabric. I maintain even stitch lengths, especially around curves, to preserve the ball’s shape. For added dimension, I layer different colored threads or add French knots strategically. Contrasting top stitching can highlight imperfections in stitching, so I ensure my technique remains consistent throughout each segment. Testing colors on scrap fabric first guarantees perfect contrast and coverage!
Teething-Safe Soft Baby Toss Ball

When I’m crafting a baby toss ball, safety becomes my absolute top priority—I select only non-toxic cotton or organic fabrics that can safely go into tiny mouths. I double-stitch every seam to withstand relentless tugging and chewing, ensuring nothing comes apart during teething exploration.
I love incorporating varied textures like minky and fleece alongside securely stitched ribbon loops, giving babies multiple sensory experiences while soothing sore gums. My balls measure 10–12 cm in diameter—perfectly sized for little hands to grasp and toss.
I use hypoallergenic poly-fil for stuffing and choose bright, contrasting colors to engage developing vision. Machine washability is essential, so I select color-fast fabrics that endure frequent laundering. For a personal touch, I often embroider the baby’s name on one of the fabric panels before assembling the ball. The result? A developmental toy supporting motor skills, tactile exploration, and teething comfort—all in one adorable handmade package!
Juggling Ball Set With Custom Sizing

Crafting juggling balls opens up a world of customization I absolutely love—from seven distinct size options ranging from 61 mm to 79 mm diameter, to choosing between firm 100% fill or softer 75% fill for perfect hand feel. I can build sets using 4-panel or premium 12-panel designs with synthetic leather, vinyl, or eco-friendly fabrics. The fill materials are incredibly versatile: plastic media, iron pellets, organic grains, or soft beads, each offering different weights and grip characteristics. I’ll mix densities to achieve precise weight targets with less than 0.5 g variance. Adding custom colors and logo prints transforms these into promotional items or team gear. Reinforced seams with 0.8mm thread guarantee durability, while storage pouches keep sets organized and protected between practice sessions. The Russian style weighted design with sand prevents the balls from rolling away during practice, making them ideal for both beginners and intermediate jugglers.
Appliqué and Embroidered Decorative Sphere

Since appliqué transforms simple fabric spheres into stunning works of art, I’m excited to show you how attaching fabric shapes—called “slips”—onto a base fabric creates dimensional designs perfect for decorative balls and ornaments. I’ll use fusible web to secure my cotton fabric pieces, ironing them before stitching to guarantee proper alignment.
For edge finishing, I recommend the blanket stitch for a decorative border or satin stitch for bold, smooth edges. You’ll achieve professional results by placing medium-weight tearaway stabilizer beneath your base fabric, especially on curved surfaces. An open-toe presser foot improves visibility when stitching intricate motifs. When working with knit or stretchy base fabrics for your sphere, switch to a ballpoint needle to prevent snags and skipped stitches.
I love layering complementary fabrics and adding embellishments like French knots or thread painting. Experiment with felt, silk, or velvet to expand your creative possibilities!
Conclusion
I’m thrilled you’ve discovered these amazing ball sewing projects! Whether you’re crafting sensory toys for little ones, whimsical decorations for your home, or personalized juggling balls, each design offers endless creative possibilities. Don’t let intimidation hold you back—start with the beginner-friendly six-panel ball and work your way up. Grab those fabric scraps, thread your needle, and let’s create something extraordinary together. Your next handmade masterpiece is just one stitch away. Happy sewing!

Keep reading
20 Latest Crochet Neck Warmer Ideas To Try In 2025!
Link up with the 20 best crochet neck warmers that blend warmth and style—discover which designs will transform your winter wardrobe!
20 Amazing Crochet Jewelry Ideas
Amazing crochet jewelry ideas await you, featuring unique designs that will inspire your creativity and elevate your accessory game to new heights.

20 Amazing Crochet Kit Ideas
Navigate through 20 amazing crochet kit ideas that spark creativity and joy; discover the perfect project to ignite your crafting passion!
Need personal guidance?
Talk to an advisor
Our care experts are here to help you make the right choice — for free.